Extra Content
Basic Drafting & Design Techniques
Assignment 3 Orthographic Projection- Use the graph paper provided to draw the front, top and right side of the following drawings.
Lecture: https://www.youtube.com/watch?v=05O1Fv4FJnY
Assignment 4 Principal Views & Linetypes
Assignment 5 Orthographic Projection: The pdf exercises attached below should be submitted for a lecture grade.
Creating Orthographic Projection
DVD Video Exercises (Click the Titles to Link to the Activity) :
Video Exercise 2-12: Beginning Dimensioning Video Exercise 2-12 Beginning Dimensioning.jpg
Assignment 10 All jpg files attached below should be submitted for a grade.
DVD Sections
DVD Video Exercises
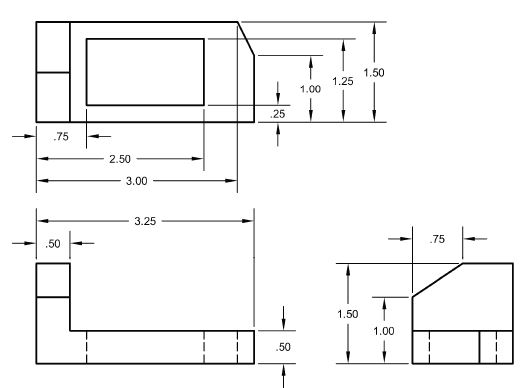
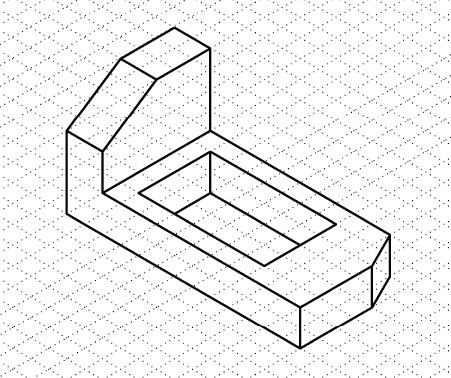
Assignment 12 Pictorials
Drawing Circular Features
Assignment 15 Advanced AutoCAD Features
Wheel Video Wheel.jpeg
- Assignment 1 Lettering & Measurement
Basics of Lettering for Engineering
Basics of MeasurementLab Work:
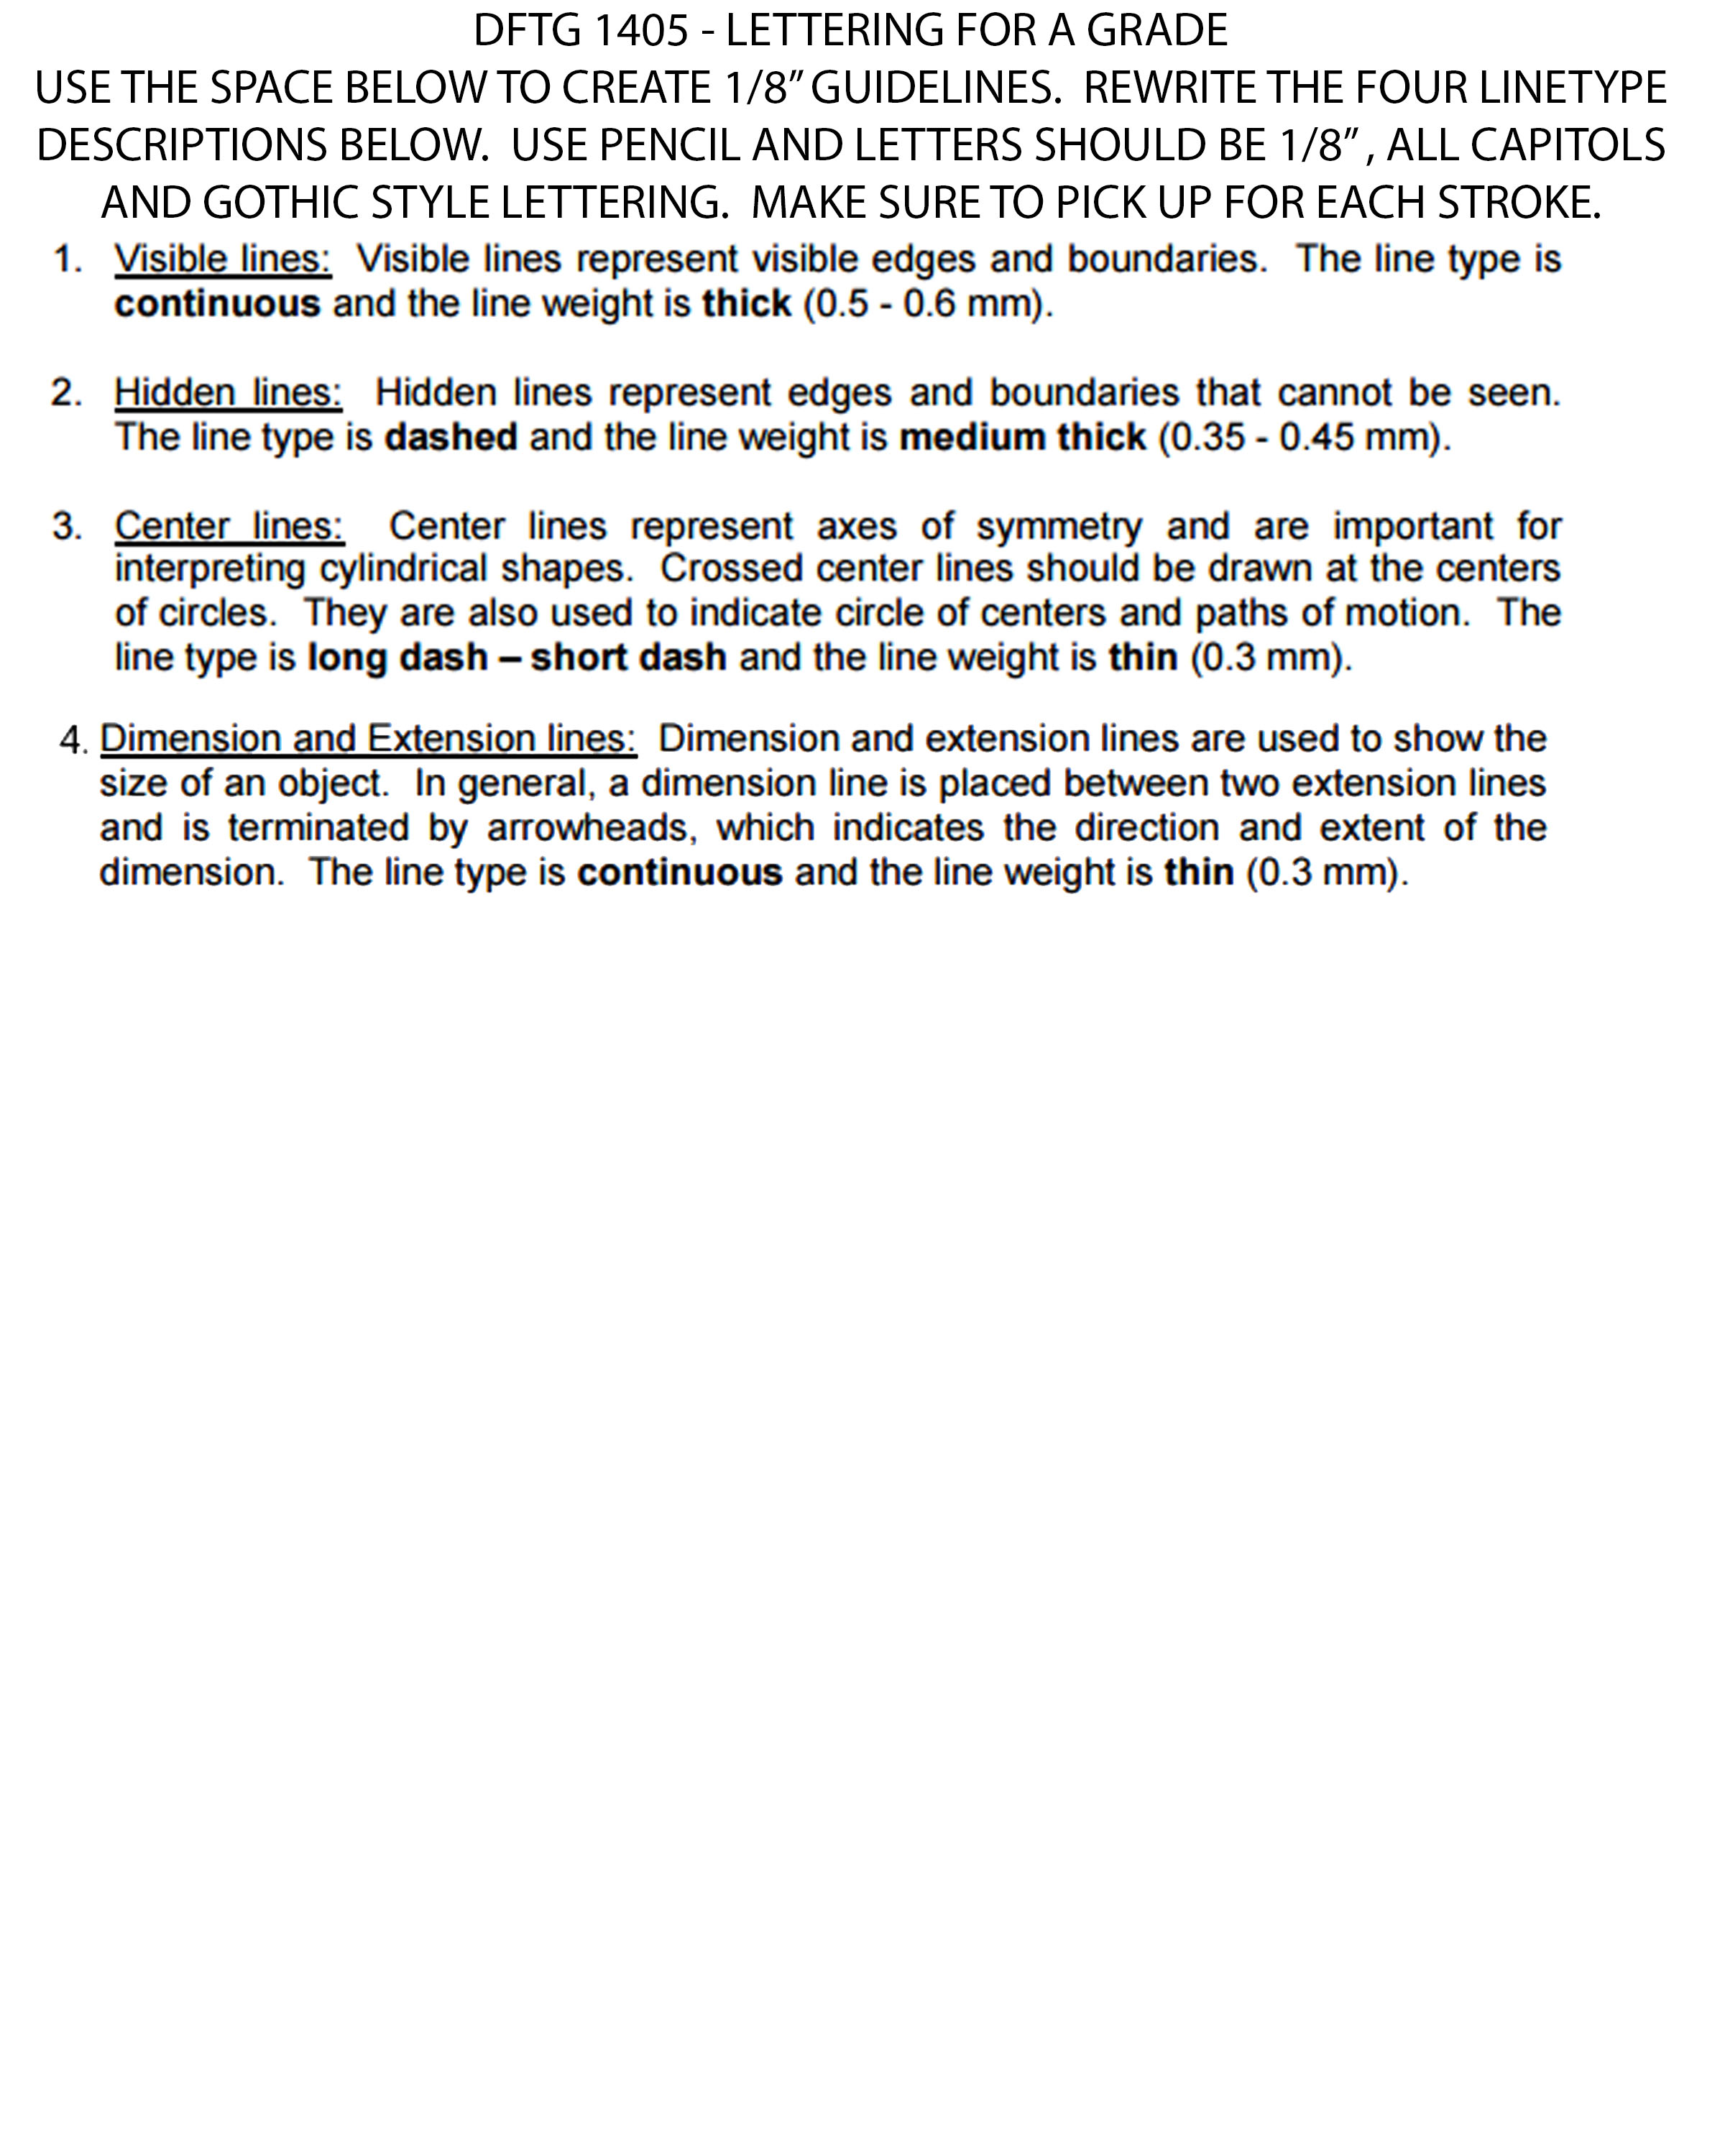
Lettering for a Grade LETTERING FOR A GRADE.pdf- Lettering Strokes HOW TO LETTER INTRODUCTION.pdf
- Lettering Practice for Engineering Graphics sheet 1 LETTERING PRACTICE SHEET 1.pdf
- Lettering Practice - Geometric Definitions sheet 2 LETTERING PRACTICE SHEET 2.pdf
- Assignment 2 Sketching Techniques and Measurement:Lecture Activities:
How to Sketch HOW TO SKETCH.pdf
Title Block TITLE BLOCK.pdf Draw the title block.
Assignment 2 Lab:
Parts to Sketch Work: Due: PART SKETCHING .pdf- Read Sketching Techniques Packet SKETCHING TECHNIQUES.pdf
- Parts of the Ruler and Measurement Activity How to Read a Ruler.wmv
- Measurement Activities MEASUREMENT PACKAGE.pptx
- Pick 4 parts from the sheet to sketch using the proper sketching techniques as discussed in the lecture.
- Divide your title block into four equal squares and place the selected sketched part into to center of the spaces.
- Each unit of measurement will equal 2 squares or a 2:1 scale factor
- Letter each part name using the Engineering Lettering skills
- Sketching Example SINGLE VIEW SKETCHES EXAMPLE.pdf
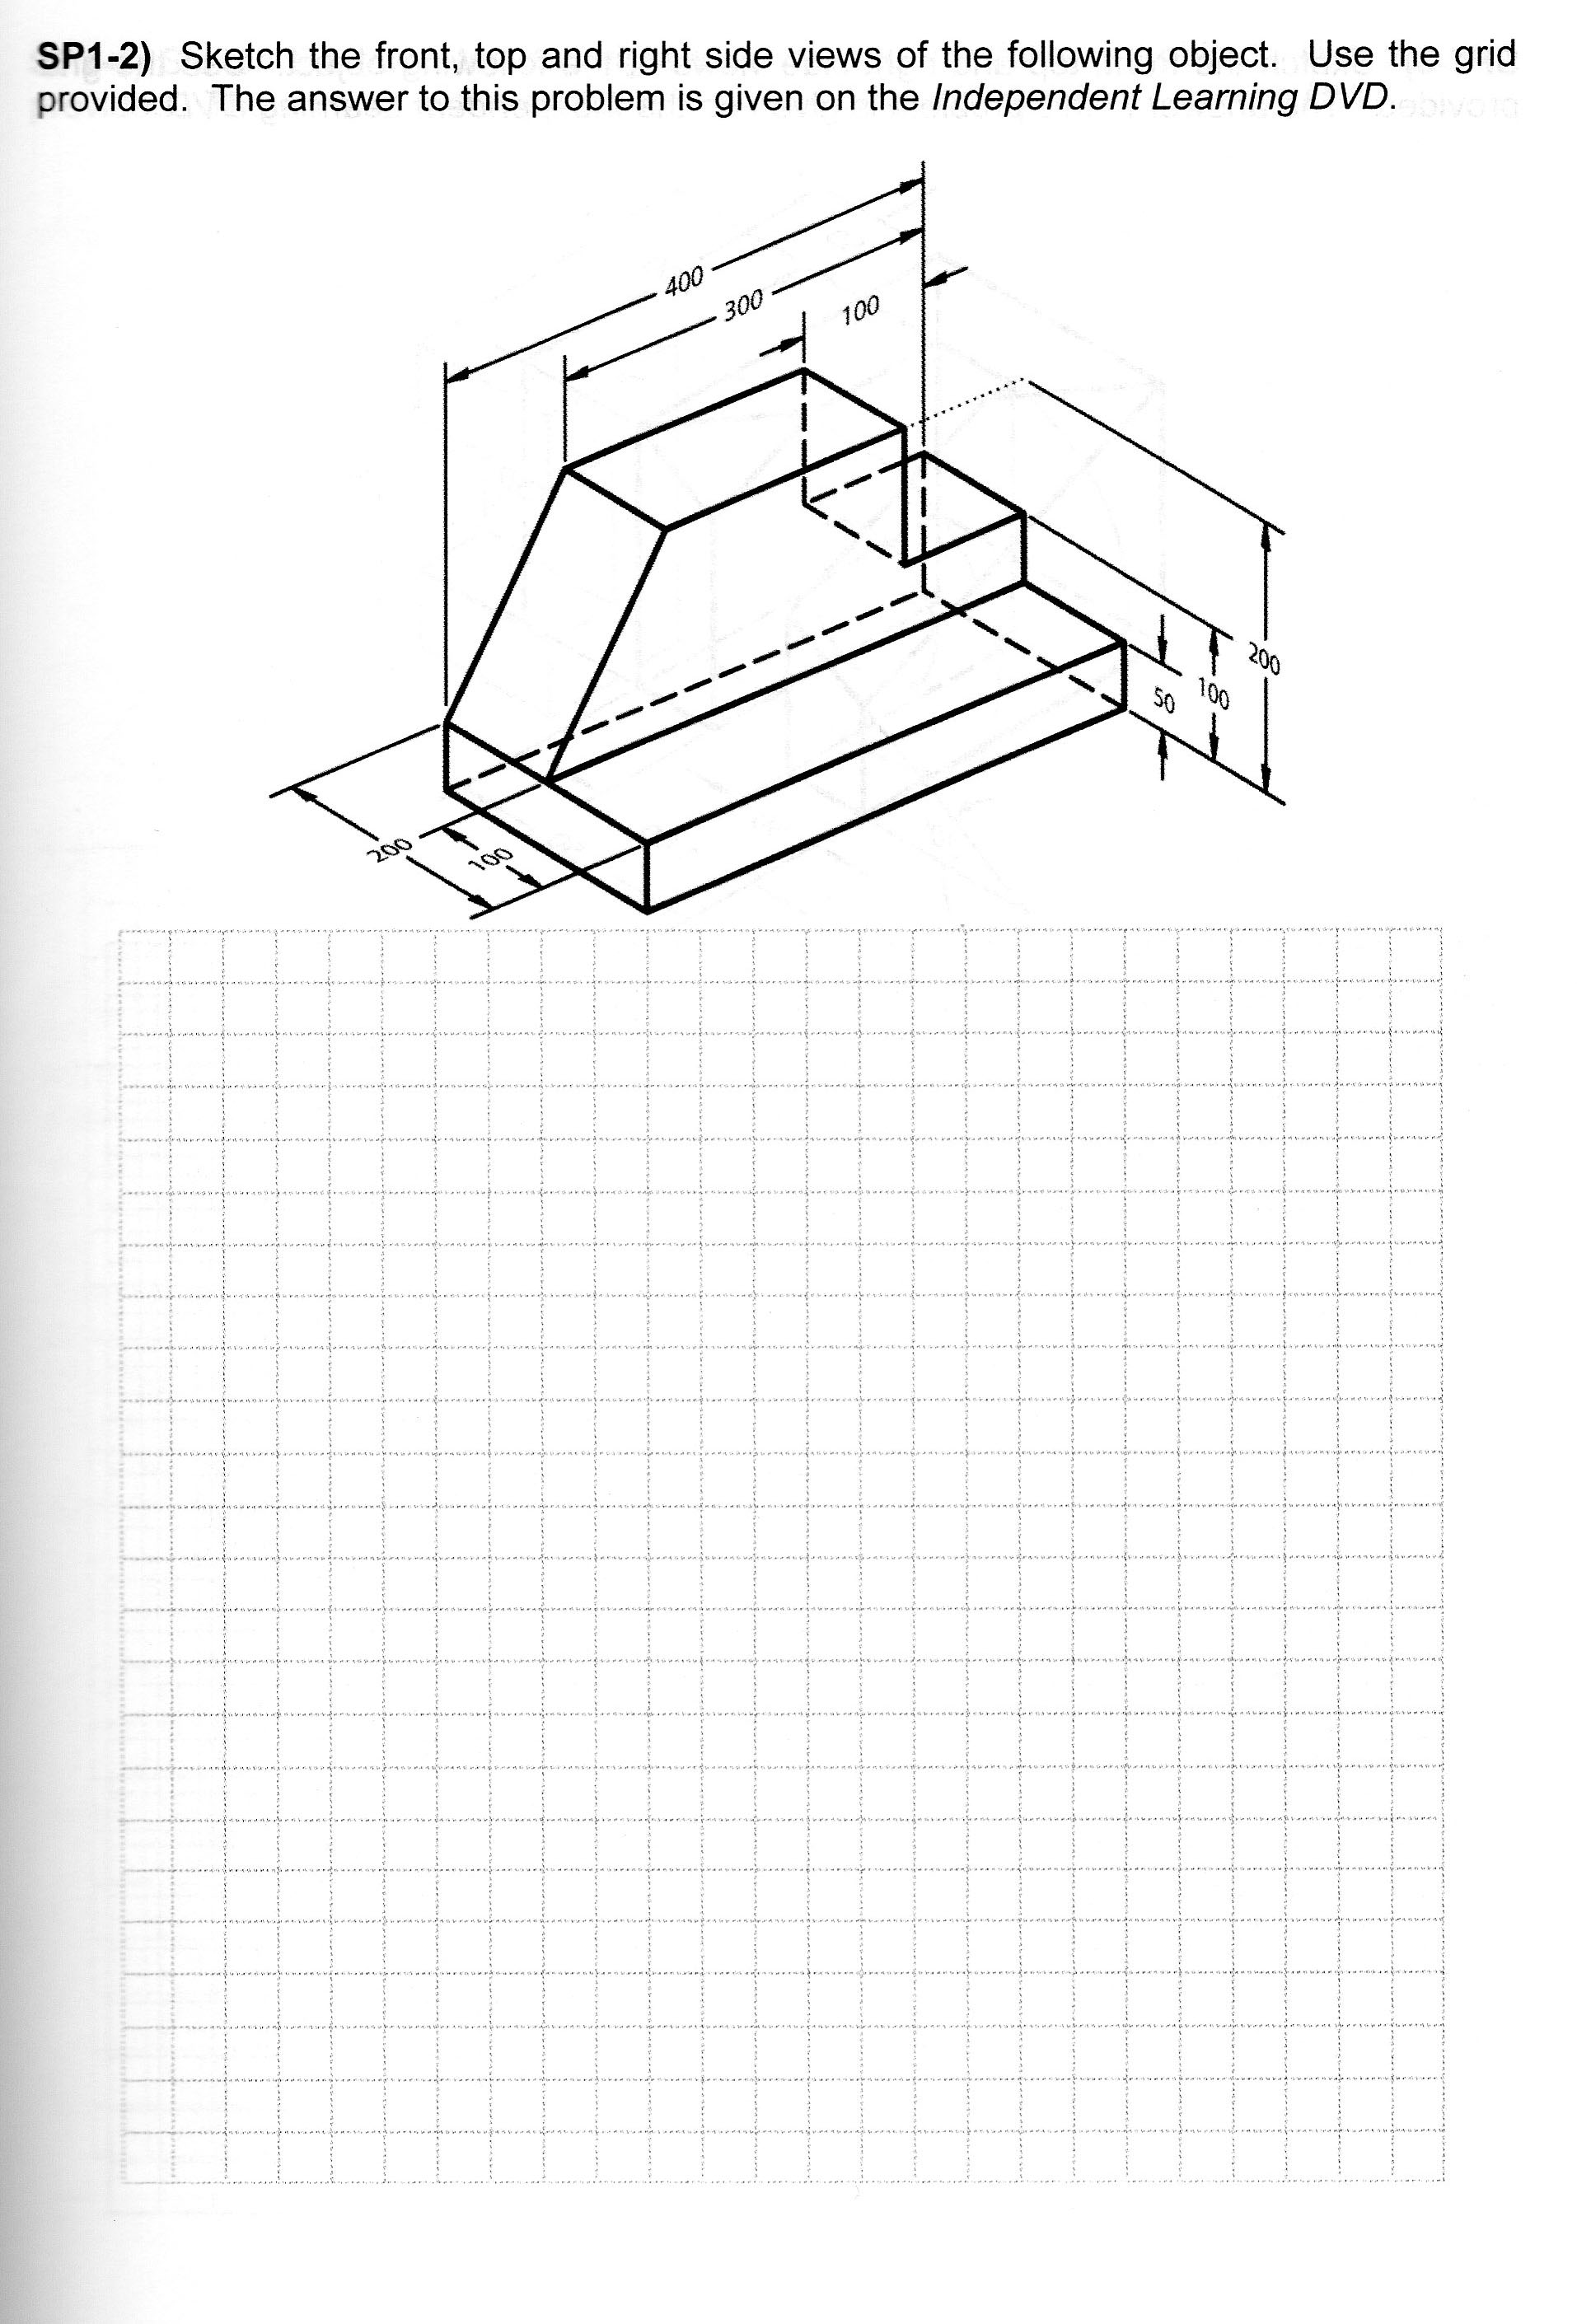
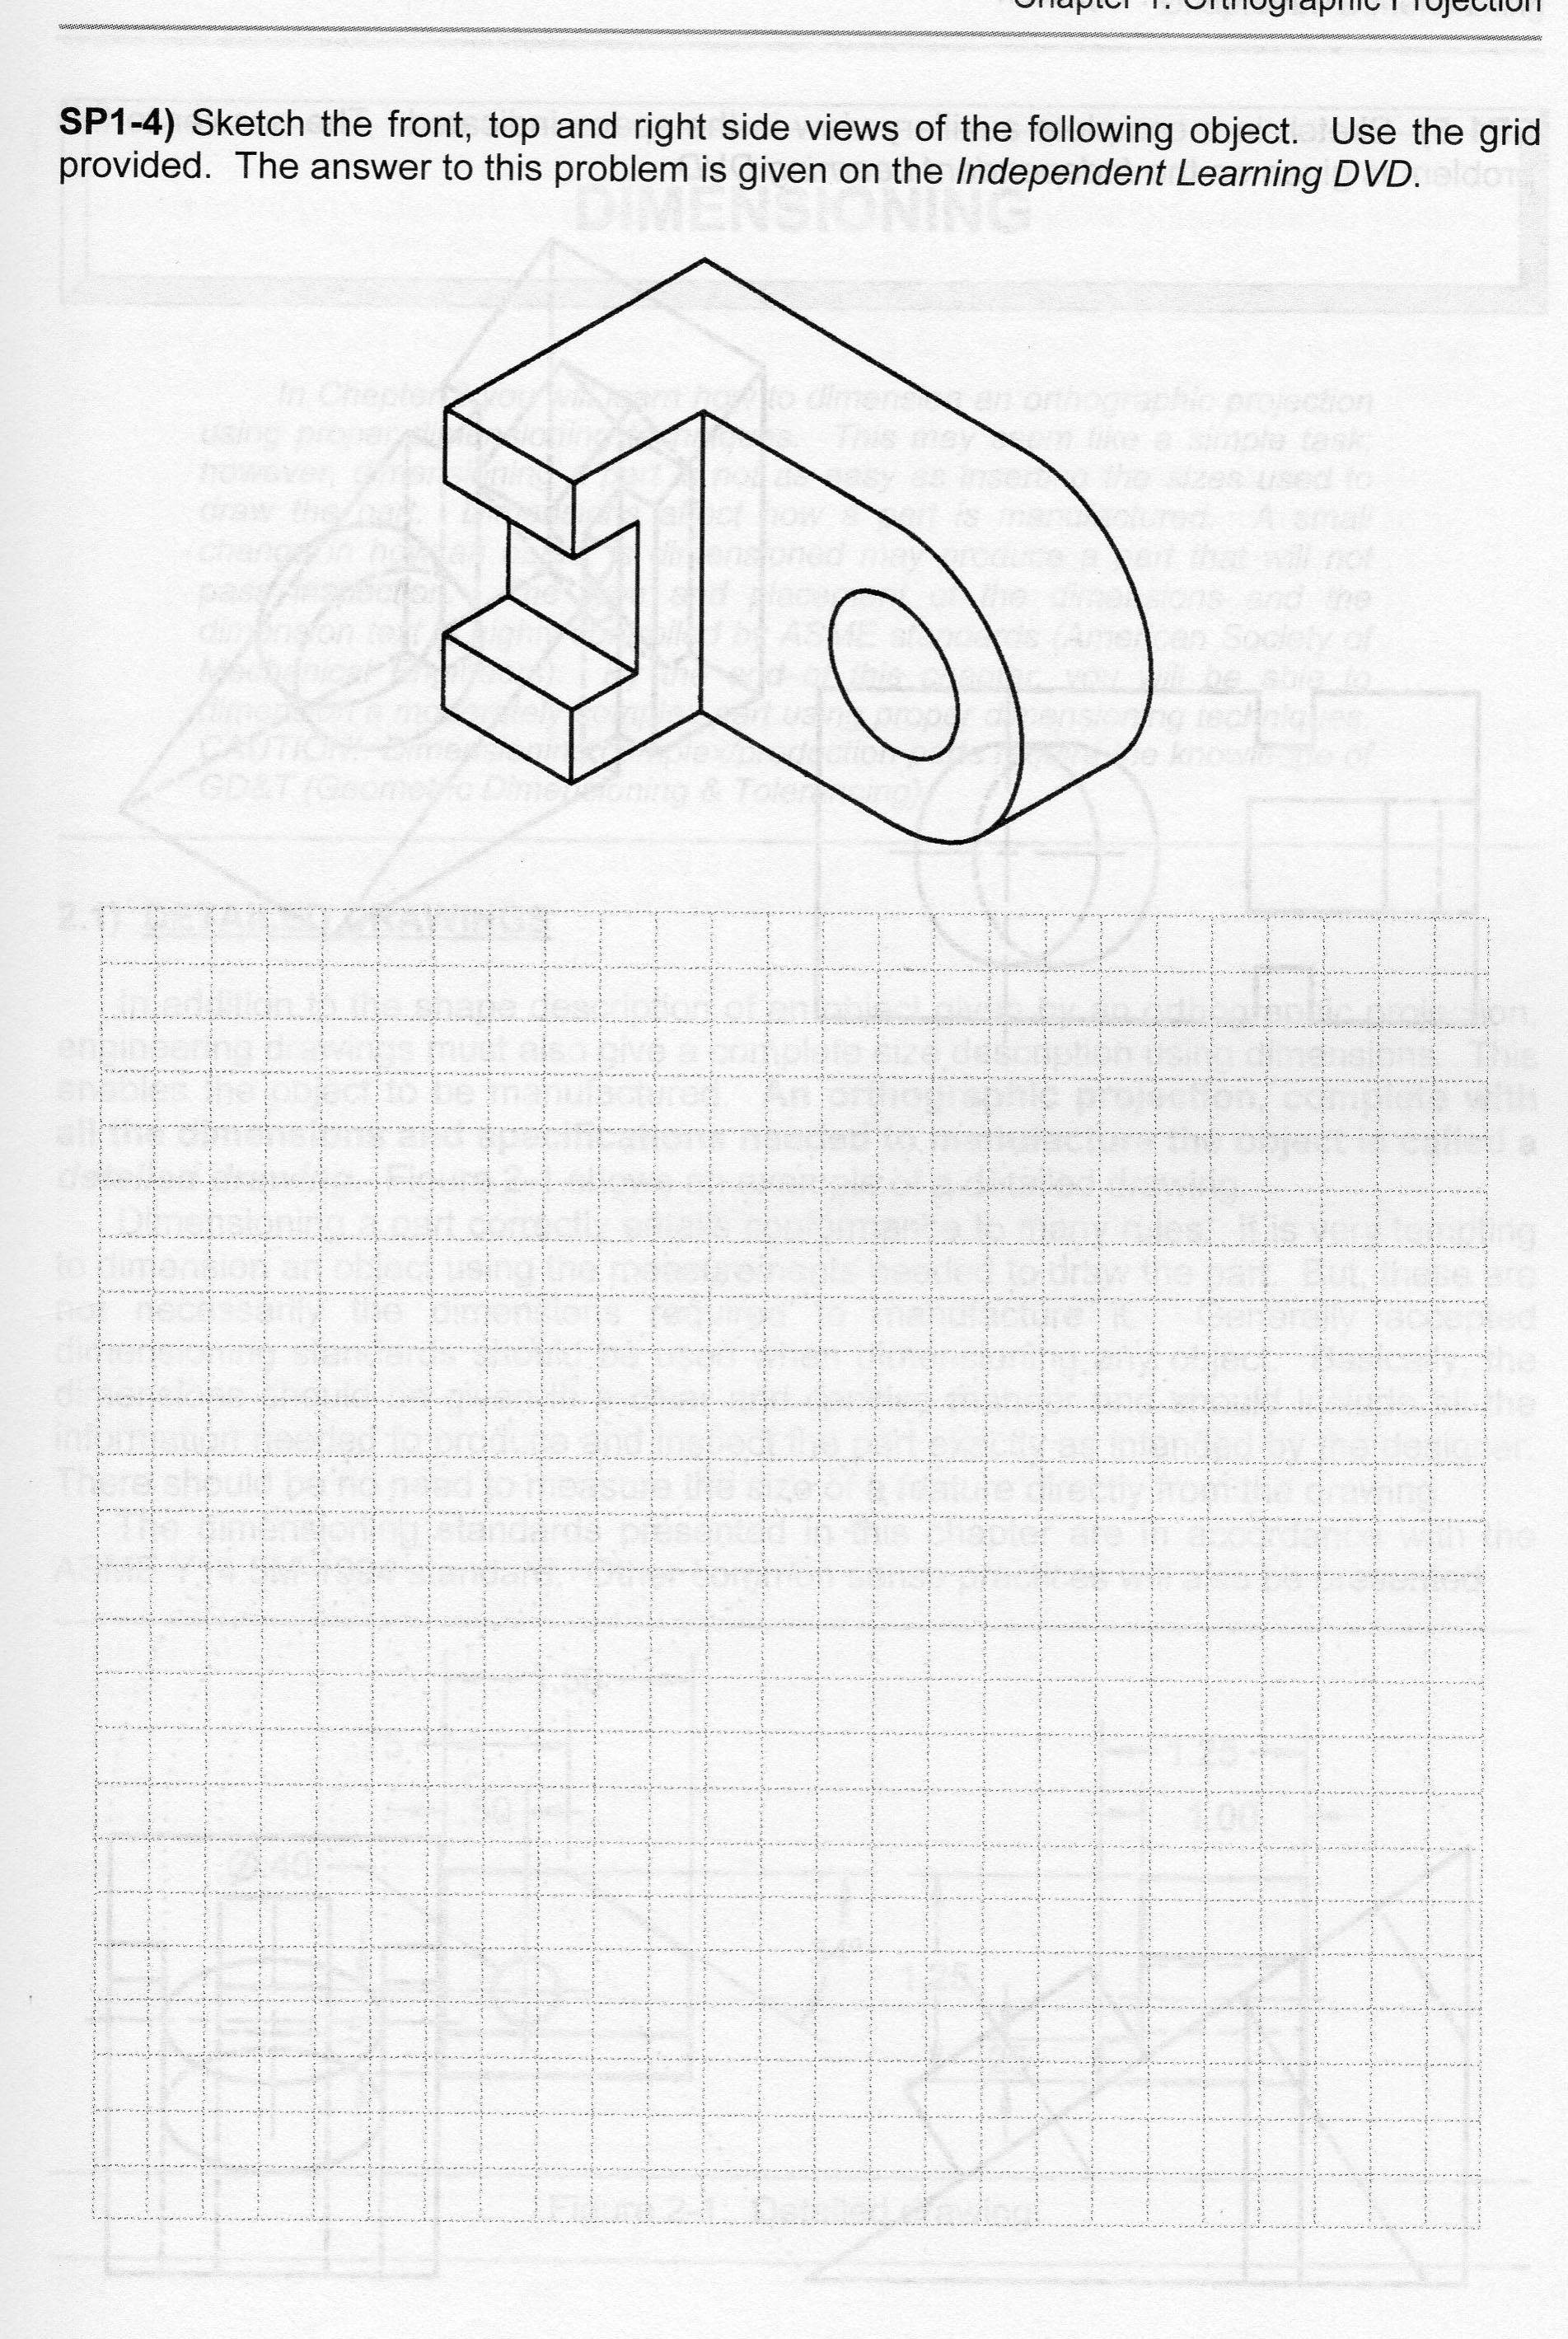
Assignment 3 Orthographic Projection- Use the graph paper provided to draw the front, top and right side of the following drawings.
- All titles should include your name and Period.
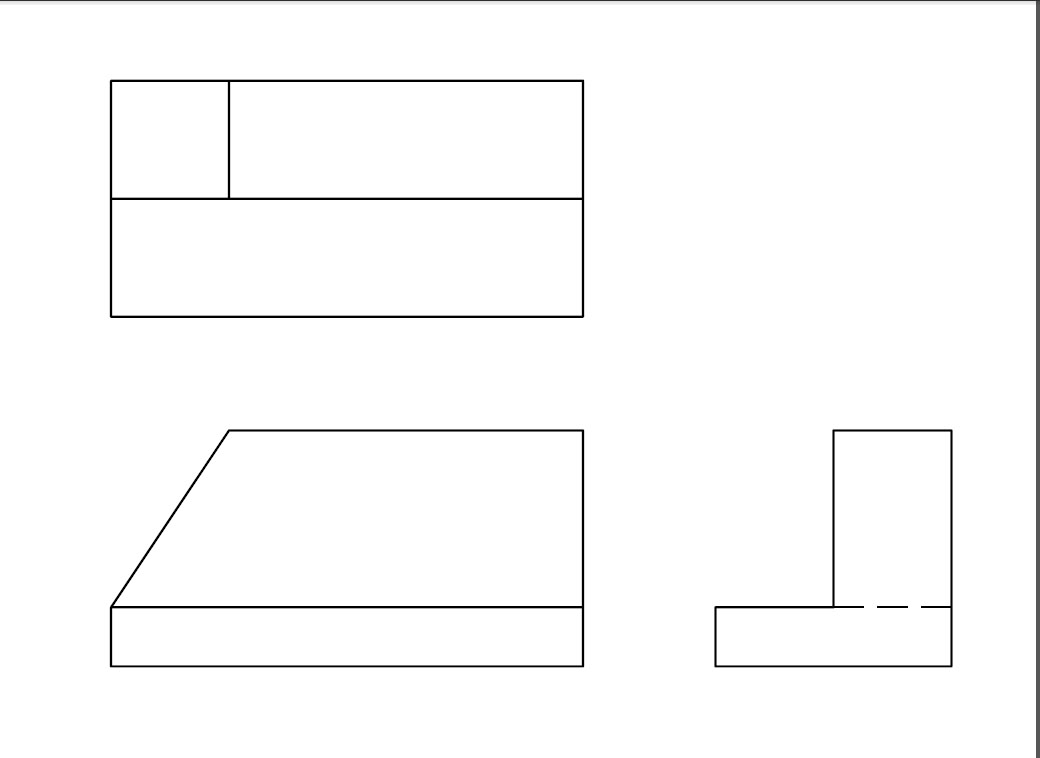
- SP 1-2 SP1-2.jpg SP 1-4 SP1-4.jpg Answer Keys: SP1-2 Solution.jpg SP 1-4 Solution.jpg
Lecture: https://www.youtube.com/watch?v=05O1Fv4FJnY
- Assignment 3 Lab: Use your own paper to hand draw an orthographic drawing of P1-1.pdf , P1-5.pdf & P1-7.pdf : These are front, top and right side drawings. Make sure that the drawings are aligned like this sample: Sample Orthographic Projection.pdf . Use drafting equipment or a straight edge such as a ruler to keep lines straight and views aligned.
Assignment 4 Principal Views & Linetypes
- DVD Sections (Click the Titles to Link to the Activity) :
- • Exercise 1-1: Principal Views
- 4) The Standard Views
- 5) Line Types Used
- • Exercise 1-2: Line Types
- • Exercise 1-3: Line Type Us
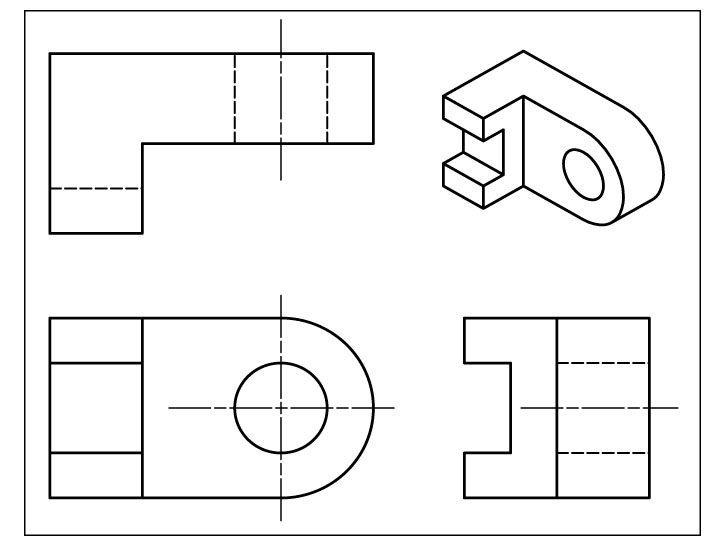
Assignment 5 Orthographic Projection: The pdf exercises attached below should be submitted for a lecture grade.
Creating Orthographic Projection
DVD Video Exercises (Click the Titles to Link to the Activity) :
- Beginning Orthographic Projection VIDEO EXERCISE 1-6(1).pdf
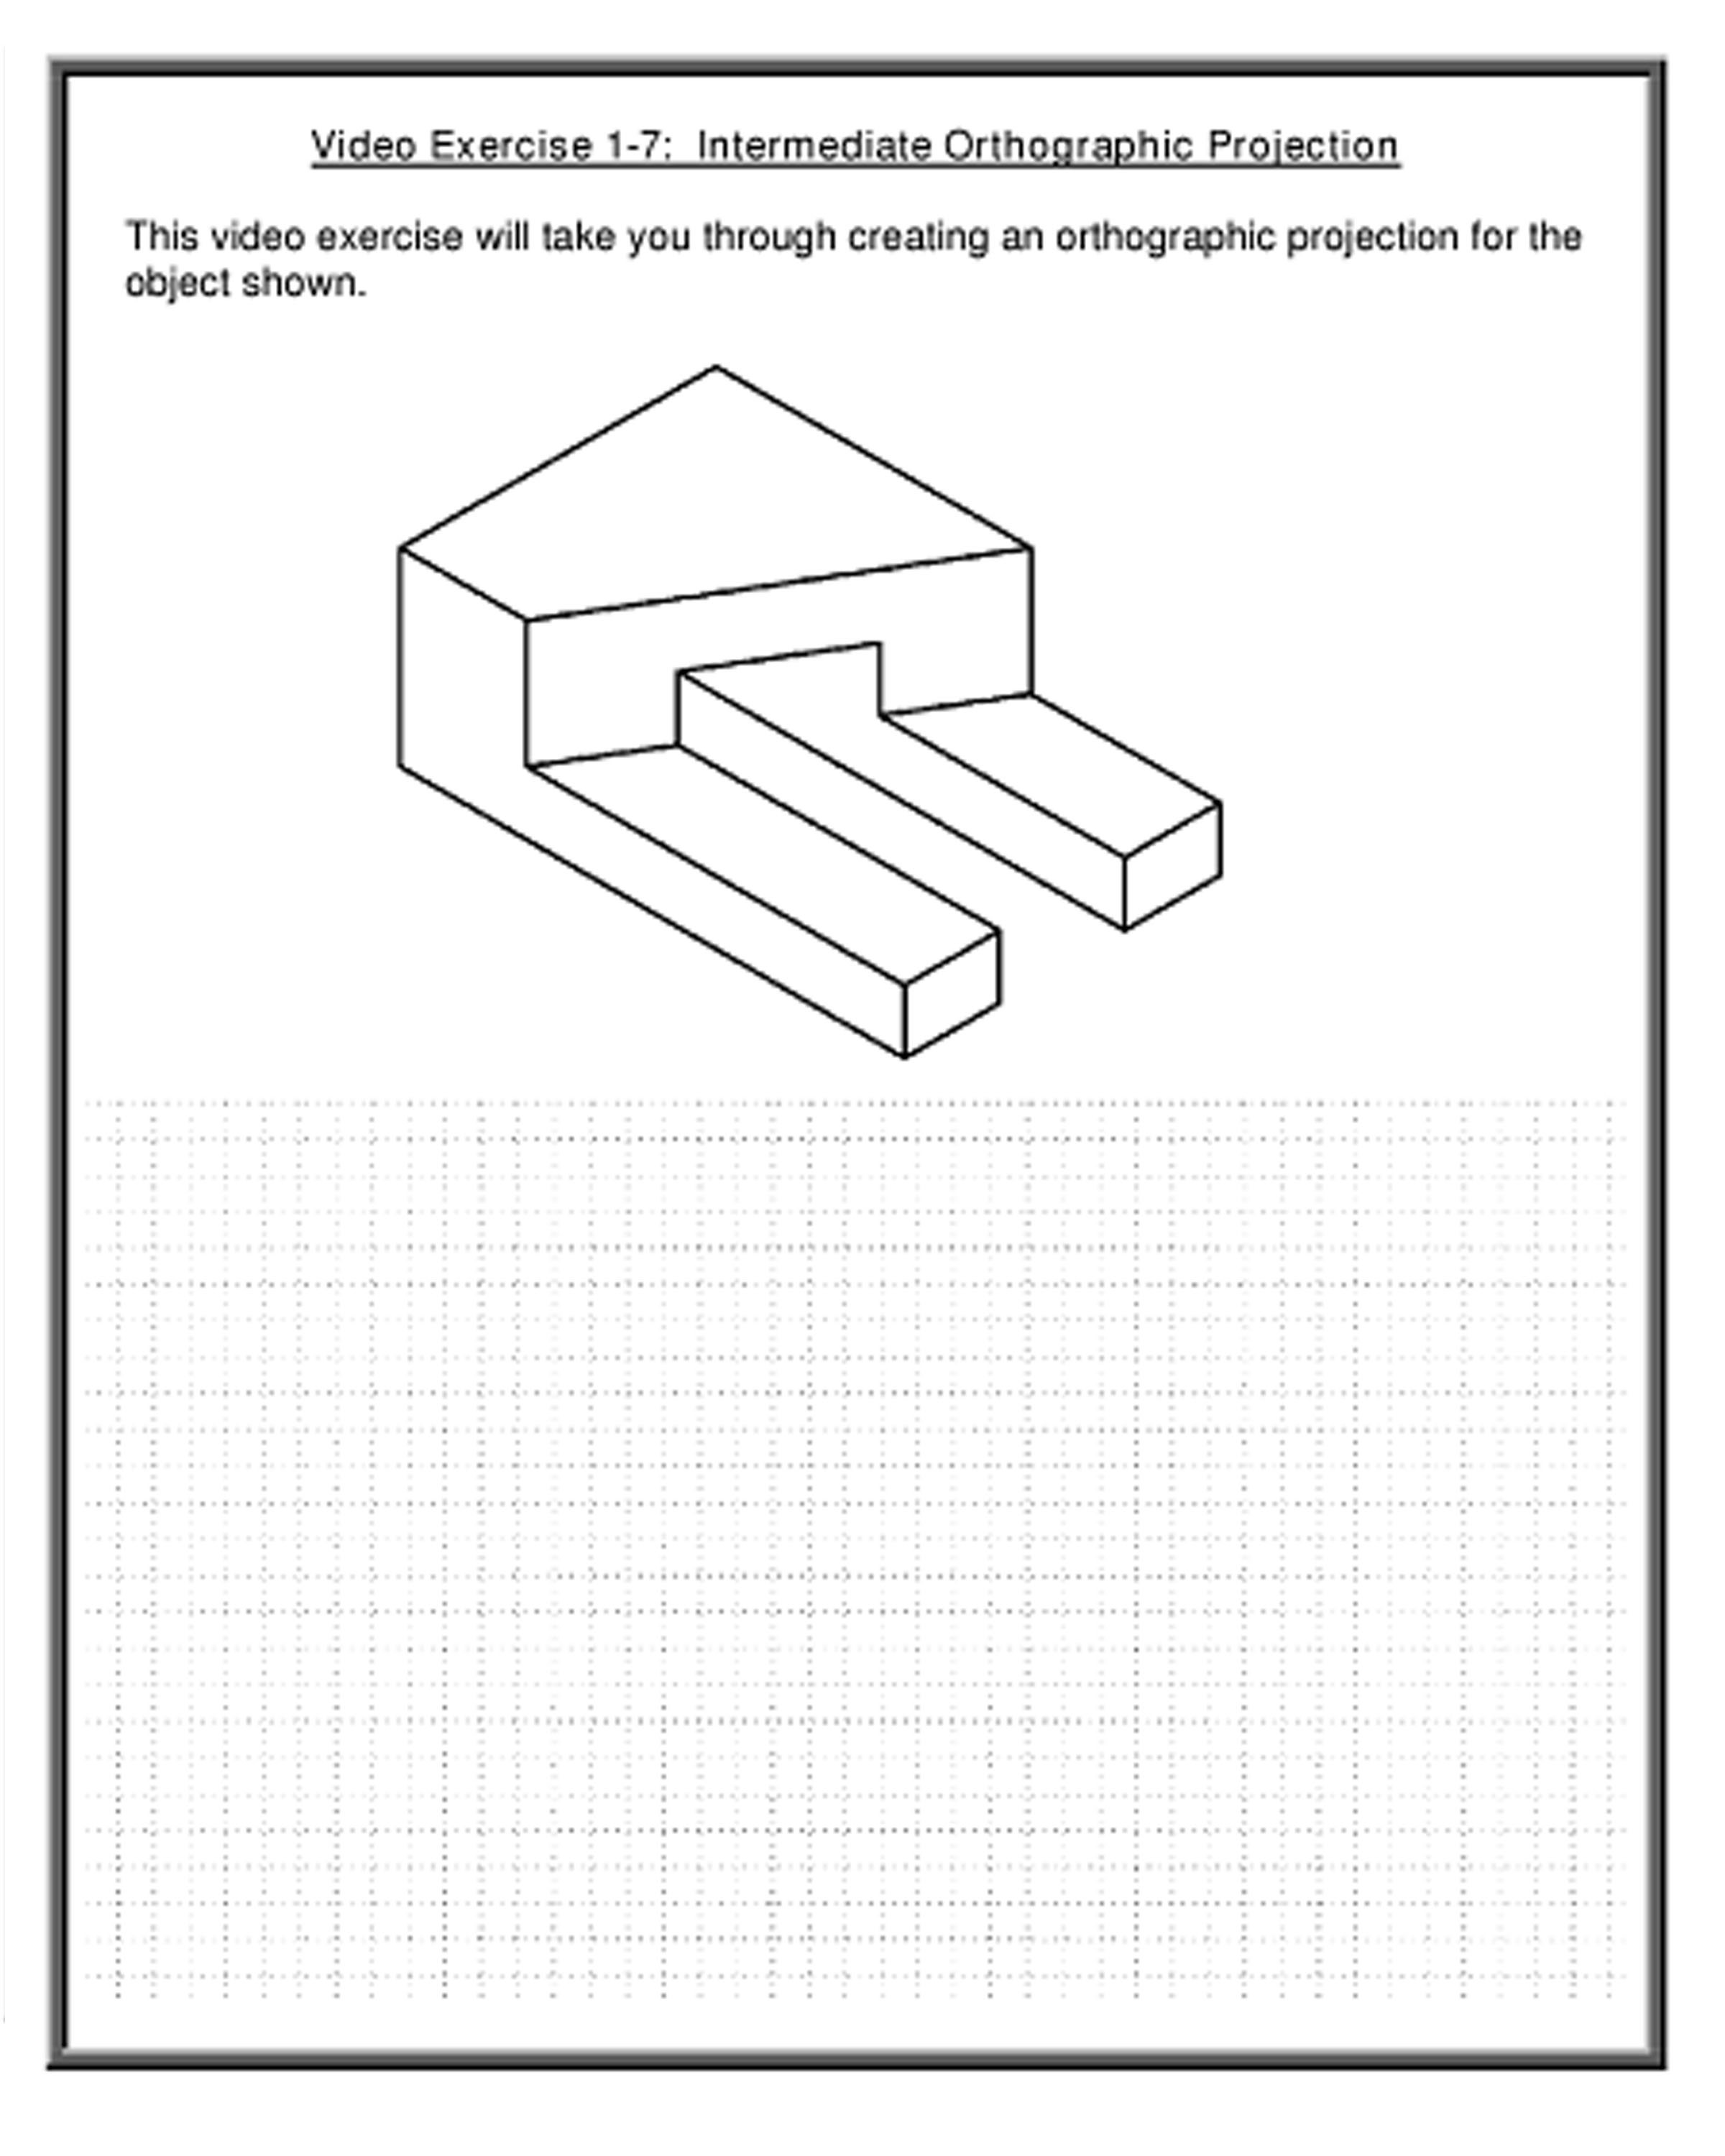
- Intermediate Orthographic Projection VIDEO EXERCISE 1-7(1).pdf
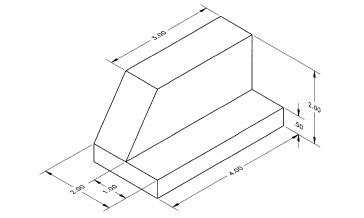
- Exercise Drawing 1 Exercise Drawing 1.pdf
- Exercise Drawing 2 Exercise 2.pdf
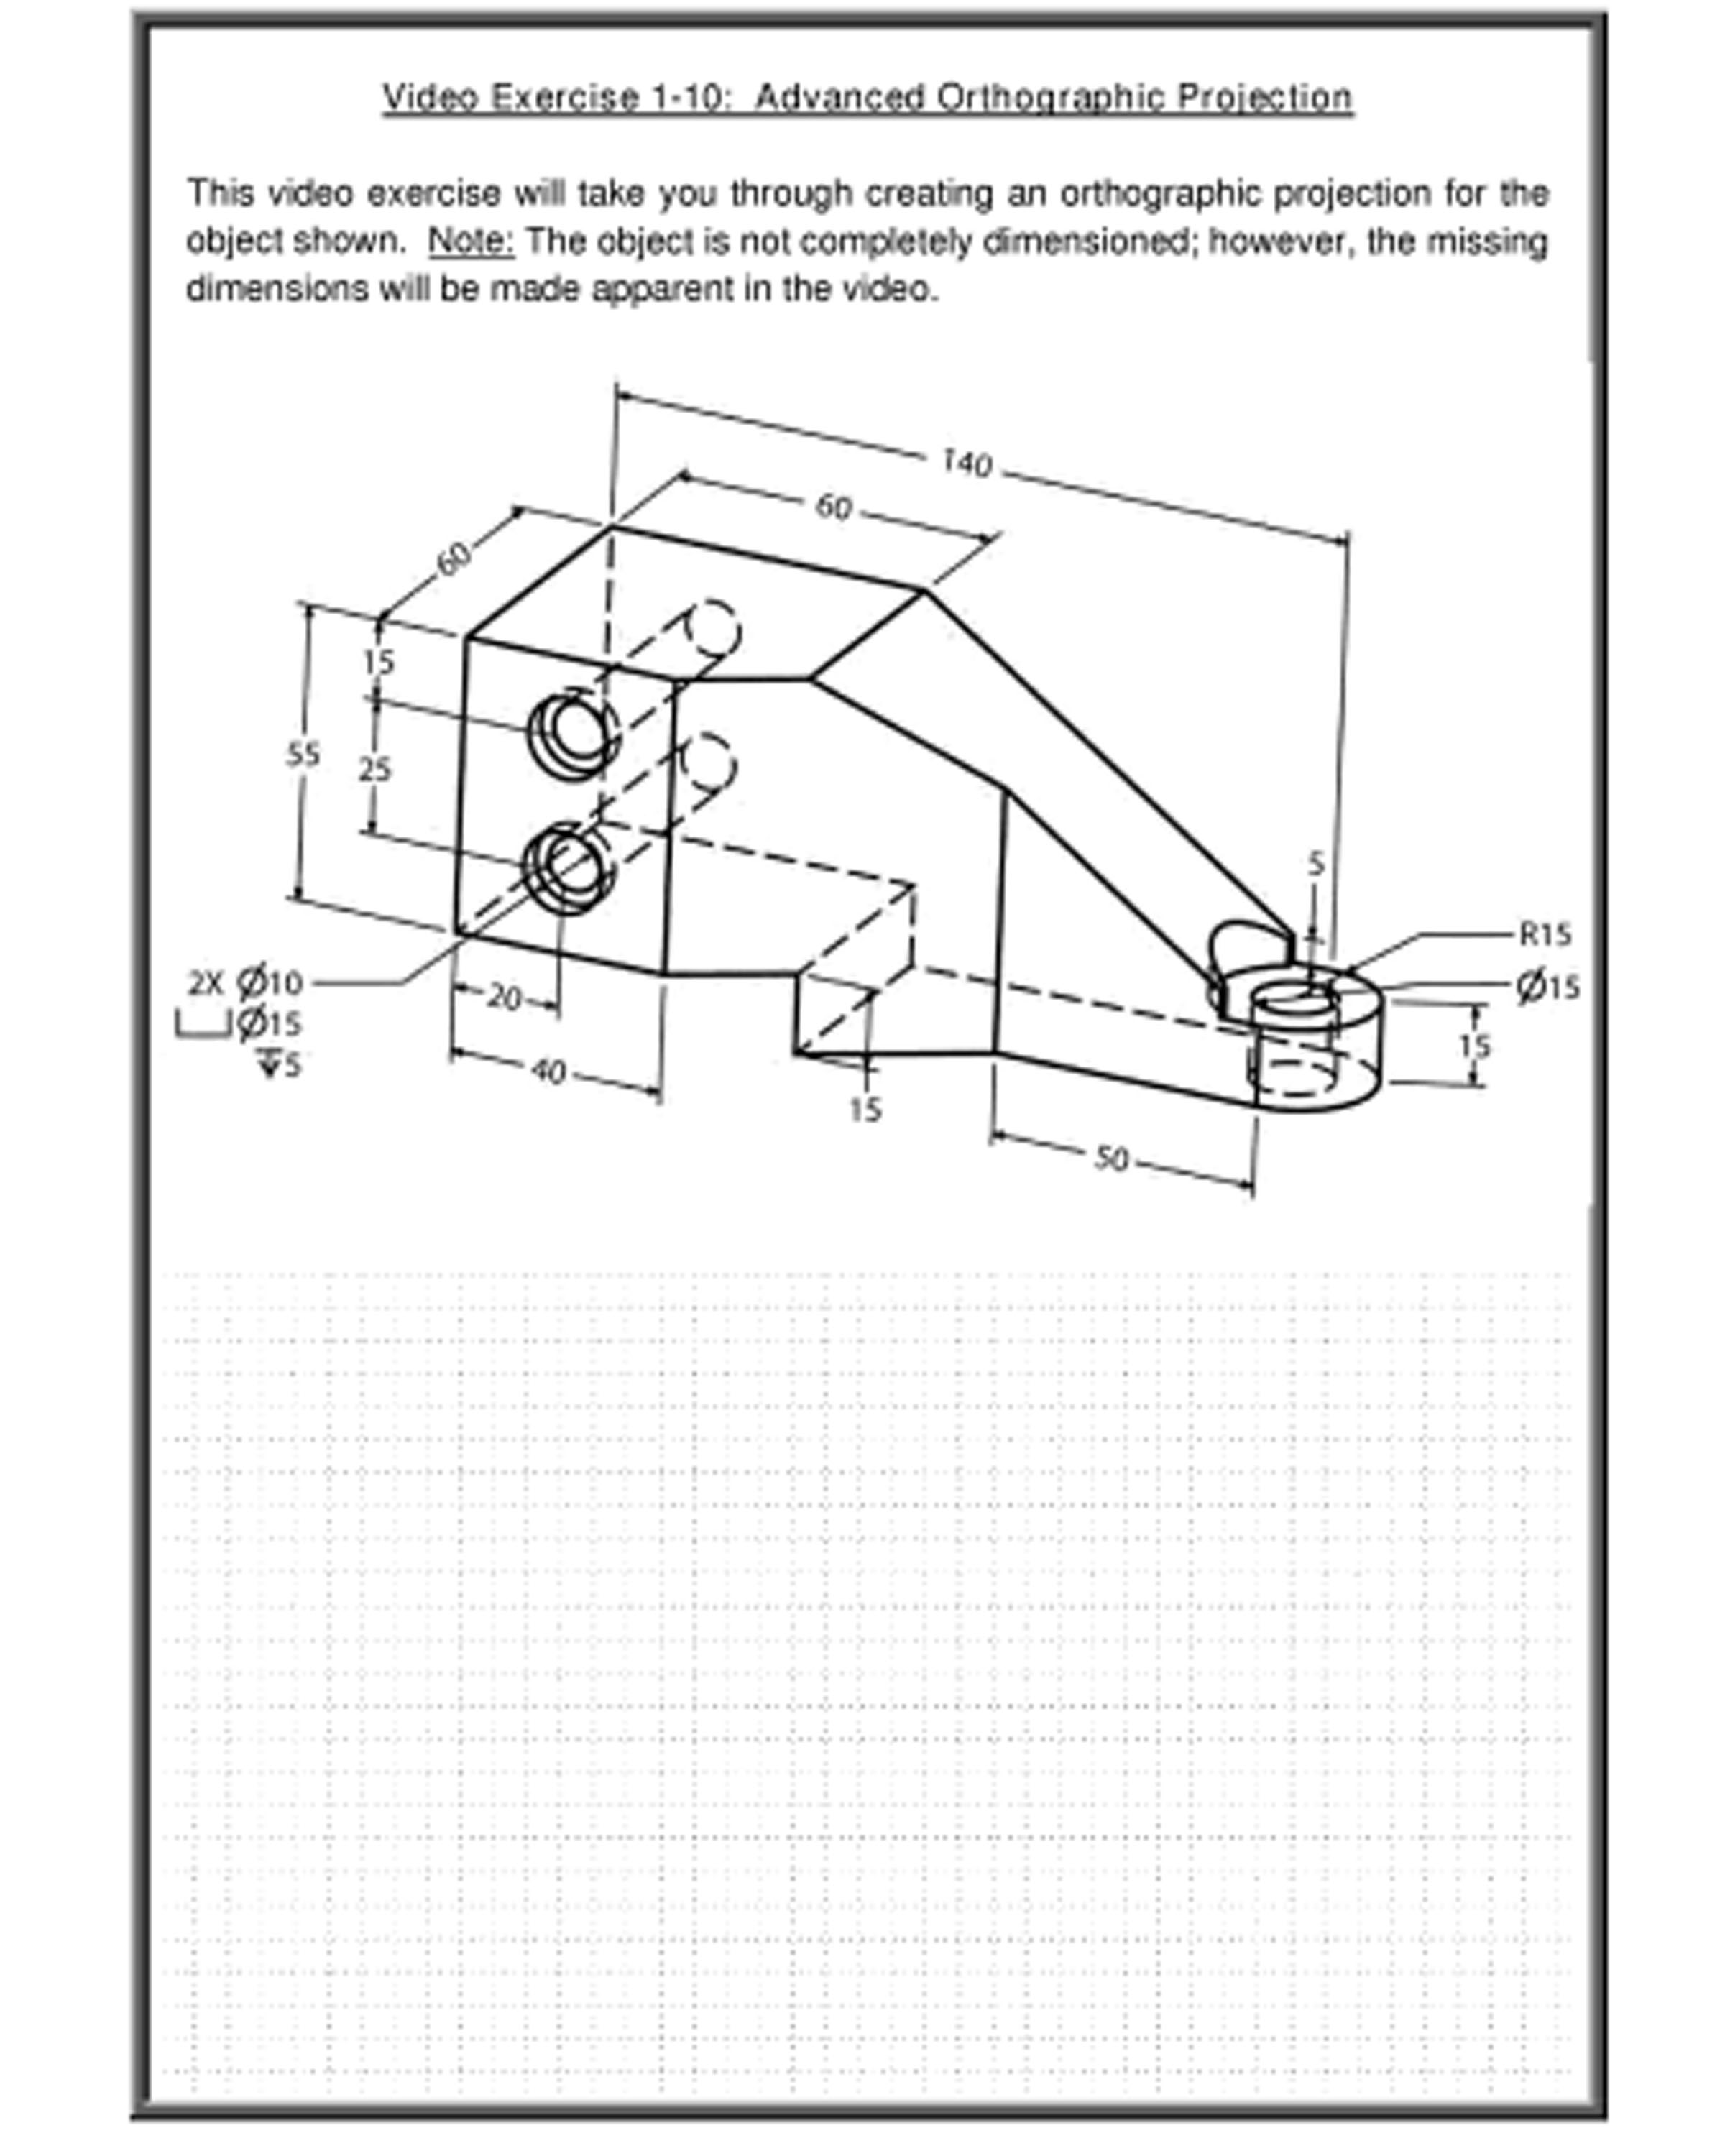
- Advanced Orthographic Projection VIDEO EXERCISE 1-10 Advanced Orthographic Projection.pdf
- Assignment 6: Orthographic Projection Sketching Techniques
- http://www.engineeringessentials.com/ege/ortho/ortho_page2.htm
- http://exchange.autodesk.com/autocadlt/enu/video/tour-user-interface This is a great user interface video developed by AutoDesk. It's for an older version of AutoCAD, but the environment is still the same.
- P1-30 Basic AutoCAD Front View.wmv P1-30.jpg Draw the front view of P1-30 and submit for a grade. Make sure to save your file for future use.
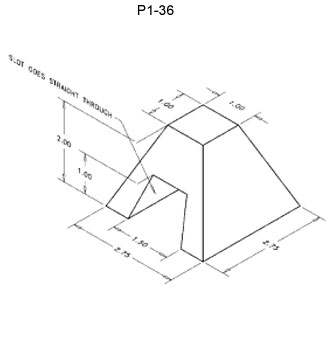
- P1-36 Orthographic Projection Front View.wmv P1-36.jpg Draw the front view of P1-30 and submit for a grade. Make sure to save your file for future use.
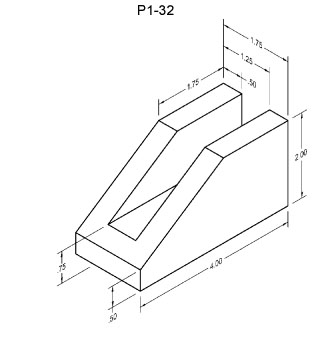
- P1-32 Hidden Lines & Part Orientation.wmv P1-32.jpg Draw the front view of P1-30 include proper part orientation and the hidden line. Submit for a grade. Make sure to save your file for future use.
- P1-49 Lab.jpg
- Use AutoCAD to create a front view of part P1-49. The drill hole is not required at this time. We will cover drill holes in our next AutoCAD session. Make sure to properly orient the part to illustrate the most detail in each view. (20points) Include a proper title.
- DVD Sections:
- 1) Detailed Drawings
- 2) Learning to Dimension
- 3) Appearance & Technique (All the audio files play at the same time - pause each video and then play one at a time.)
- • Exercise: Dimension Types
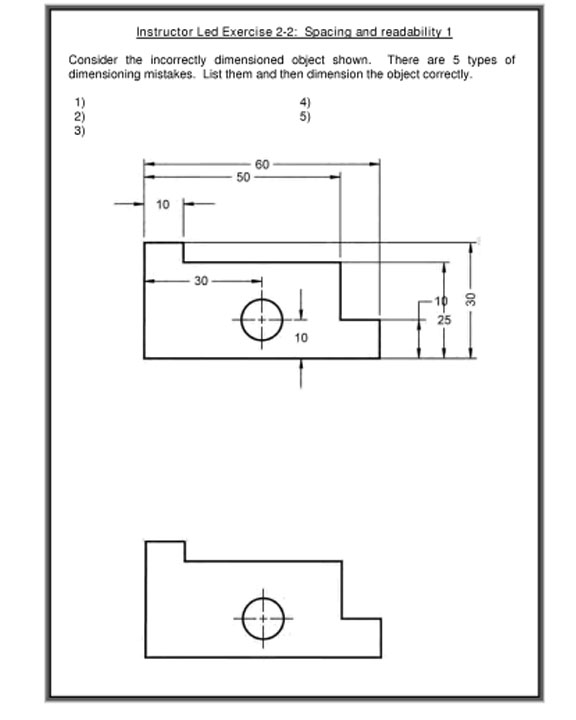
- • Exercise: Spacing and Readability 1 Spacing and Readability 1.jpg
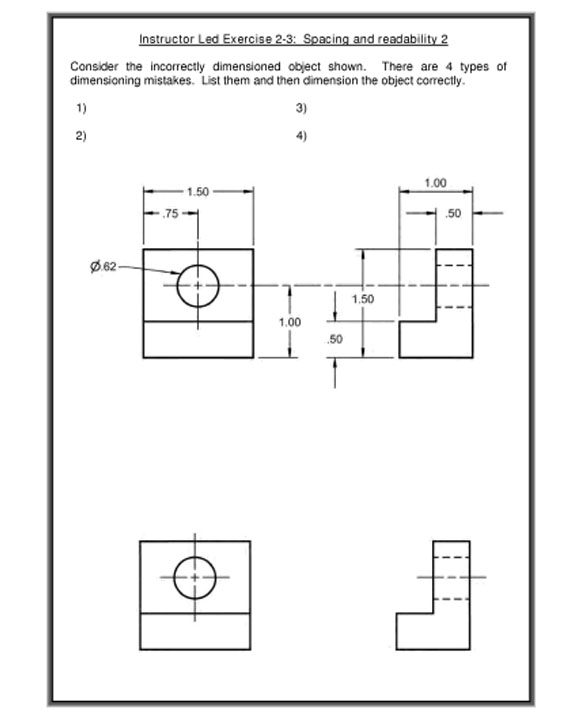
- • Exercise: Spacing and Readability 2 Spacing and Readability 2.jpg
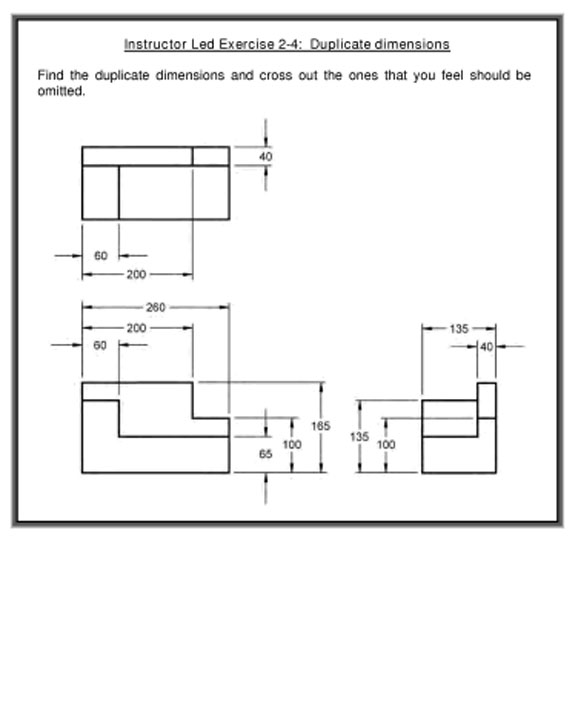
- • Exercise: Duplicate Dimensions Duplicate Dimensions.jpg
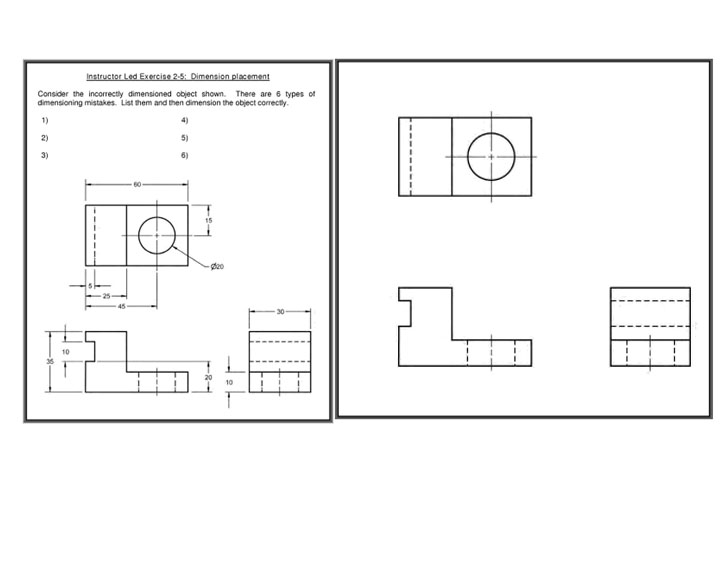
- • Exercise: Dimension Placement Dimension Placement.jpg (2 Activities)
- 4) Dimensioning Simple Features
- • Exercise: Circular and Rectangular Views
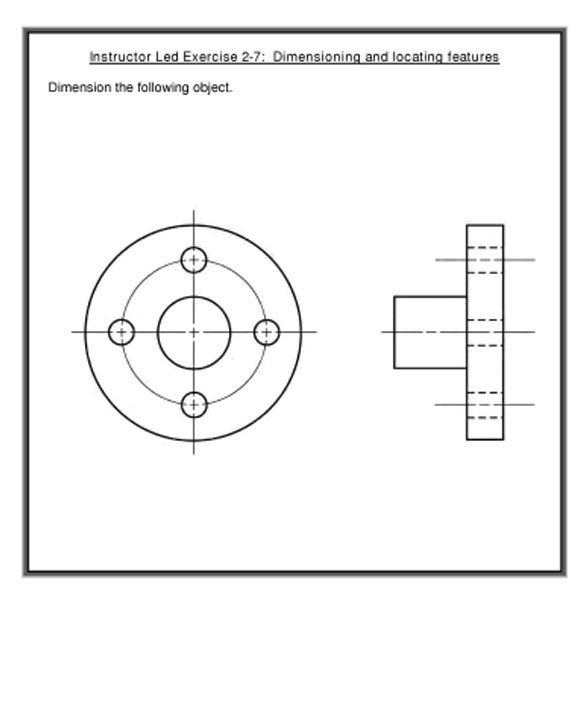
- • Exercise: Dimensioning and Locating Features Dimensioning and Locating Features.jpg
Video Exercise 2-12: Beginning Dimensioning Video Exercise 2-12 Beginning Dimensioning.jpg
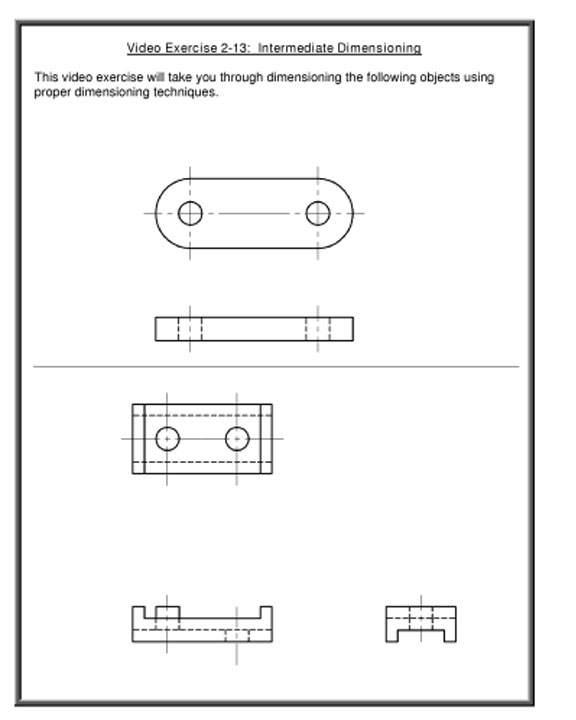
- Video Exercise 2-13: Intermediate Dimensioning Video Exercise 2-13 Intermediate Dimensioning.jpg
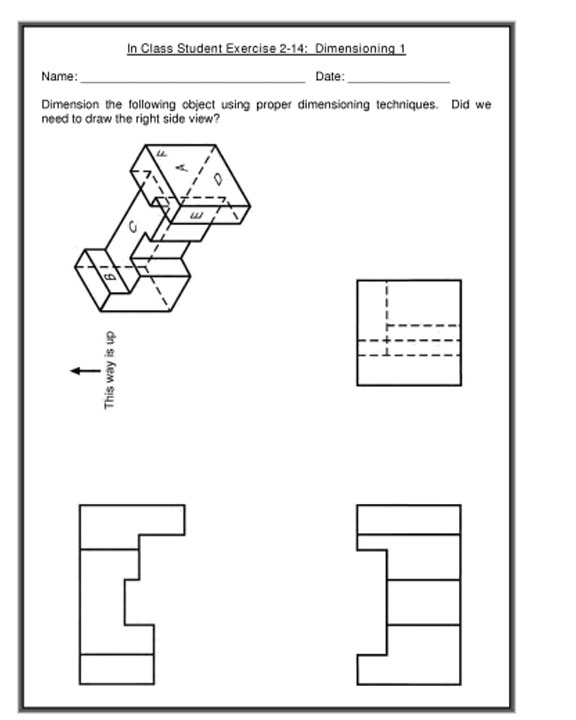
- • Exercise: Dimensioning 1 Dimensioning 1.jpg
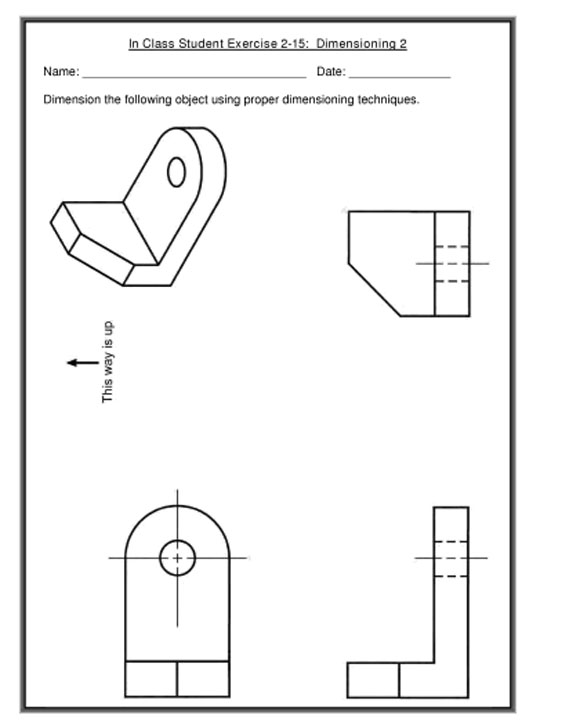
- • Exercise: Dimensioning 2 Dimensioning 2.jpg
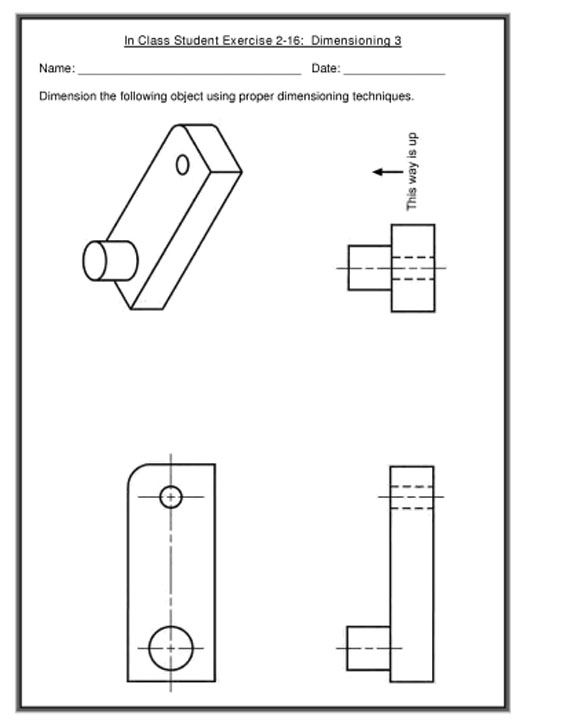
- • Exercise: Dimensioning 3 Dimensioning 3.jpg
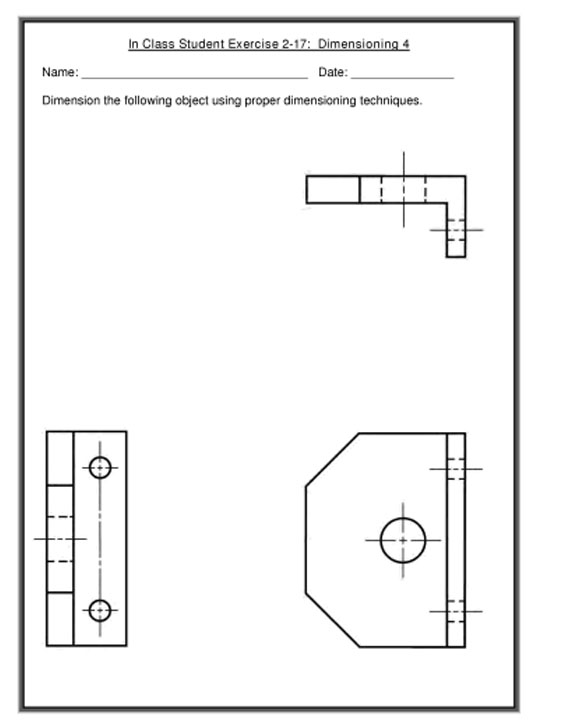
- • Exercise: Dimensioning 4 Dimensioning 4.jpg
- Assignment 9 Lecture Assignment All jpg files attached below should be submitted for a grade.
Use the attached videos over orthographic projection in AutoCAD to complete P1-30, P1-36 & P1-32. (The front view drawings from Week 3). Complete the top and right side views for each and attach all three assignments to a single e-mail and send to [email protected]. Title them P1-30Ortho, P1-36Ortho, P1-32Ortho
P1-30 Top View.wmv P1-30 Right Side.wmv P1-36 Third Angle Projection Explanation.wmv P1-36 Top View.wmv P1-36 Right Side View.wmv P1-32 Top and Right Side.wmv
Assignment 9 Lab: - Complete the top and right side view of P1-49 from the Week 3 Lab. The drill hole is not required yet. P1-49Ortho Lab.jpg
Assignment 10 All jpg files attached below should be submitted for a grade.
DVD Sections
- 5) Dimensioning Advanced Features These audio files play all at once. Scroll to the bottom of the page and pause each audio file and then listen to them individually.
- • Exercise 2-8: Advanced Features Advanced Features.jpg
- 6) Dimension Choice
- • Exercise 2-9: Dimension Accuracy
- • Exercise 2-11: Dimension Choice Dimension Choice.jpg
DVD Video Exercises
- 2-18 Advanced Dimensioning 1 Advanced Dimensioning 1.jpg
- 2-19 Advanced Dimensioning 2 Advanced Dimensioning 2.jpg
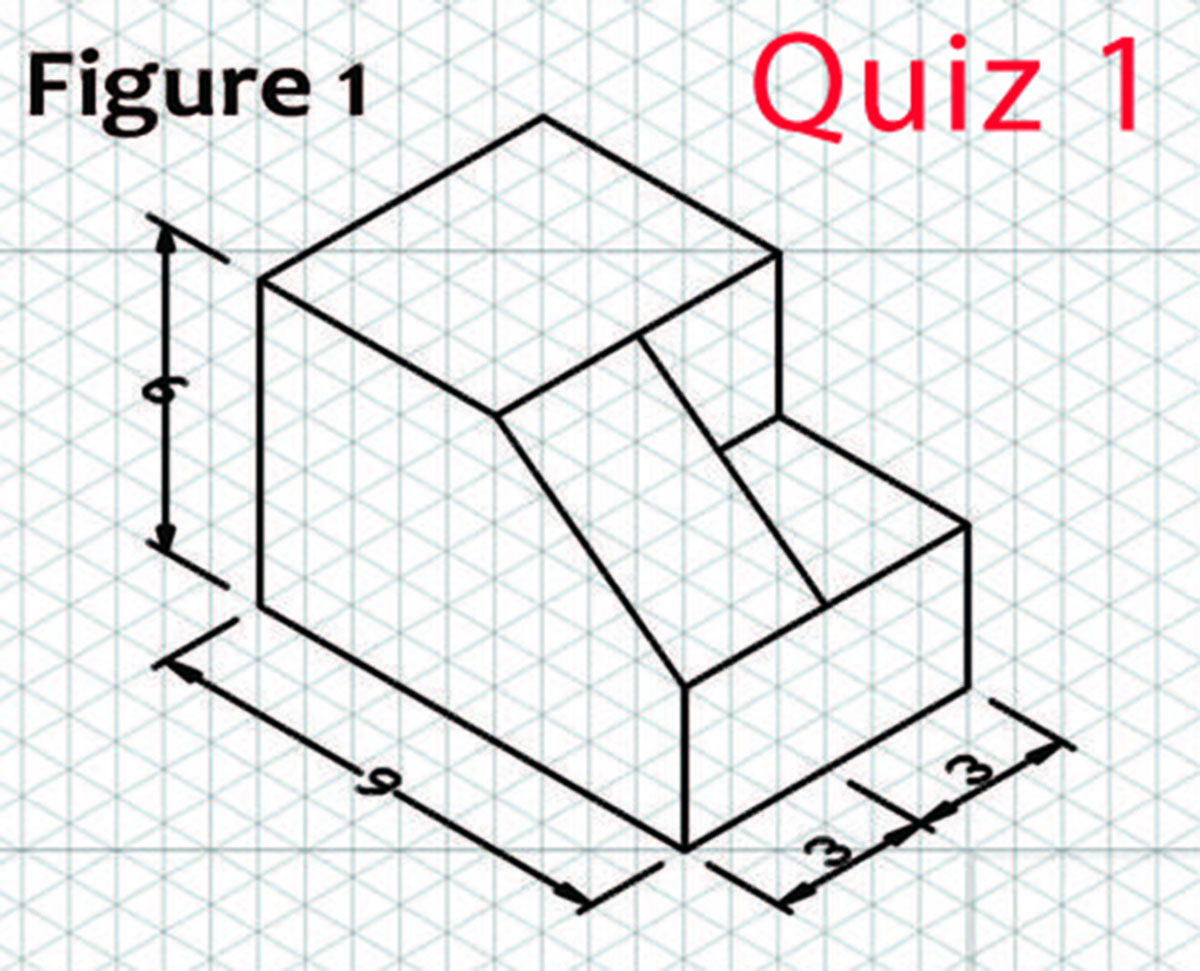
- Quiz_1.jpg Use AutoCAD to draw 1405 Quiz 1.jpg . Use a starting coordinate of 2,2. There should be 2" between drawings. Use the skills learned from previous assignments to draw a front, top and right side (orthographic projection) of the part using AutoCAD. No dimensions required at this time. Title your work F.LastName.Quiz1.
- Quiz 1 Grading Rubric: Proper part orientation: 20pts. Front, Top & Right Side Aligned: 30 pts. Proper size: 20 pts. Hidden lines: 20pts Proper titles on drawing, file and e-mail: 10 pts.
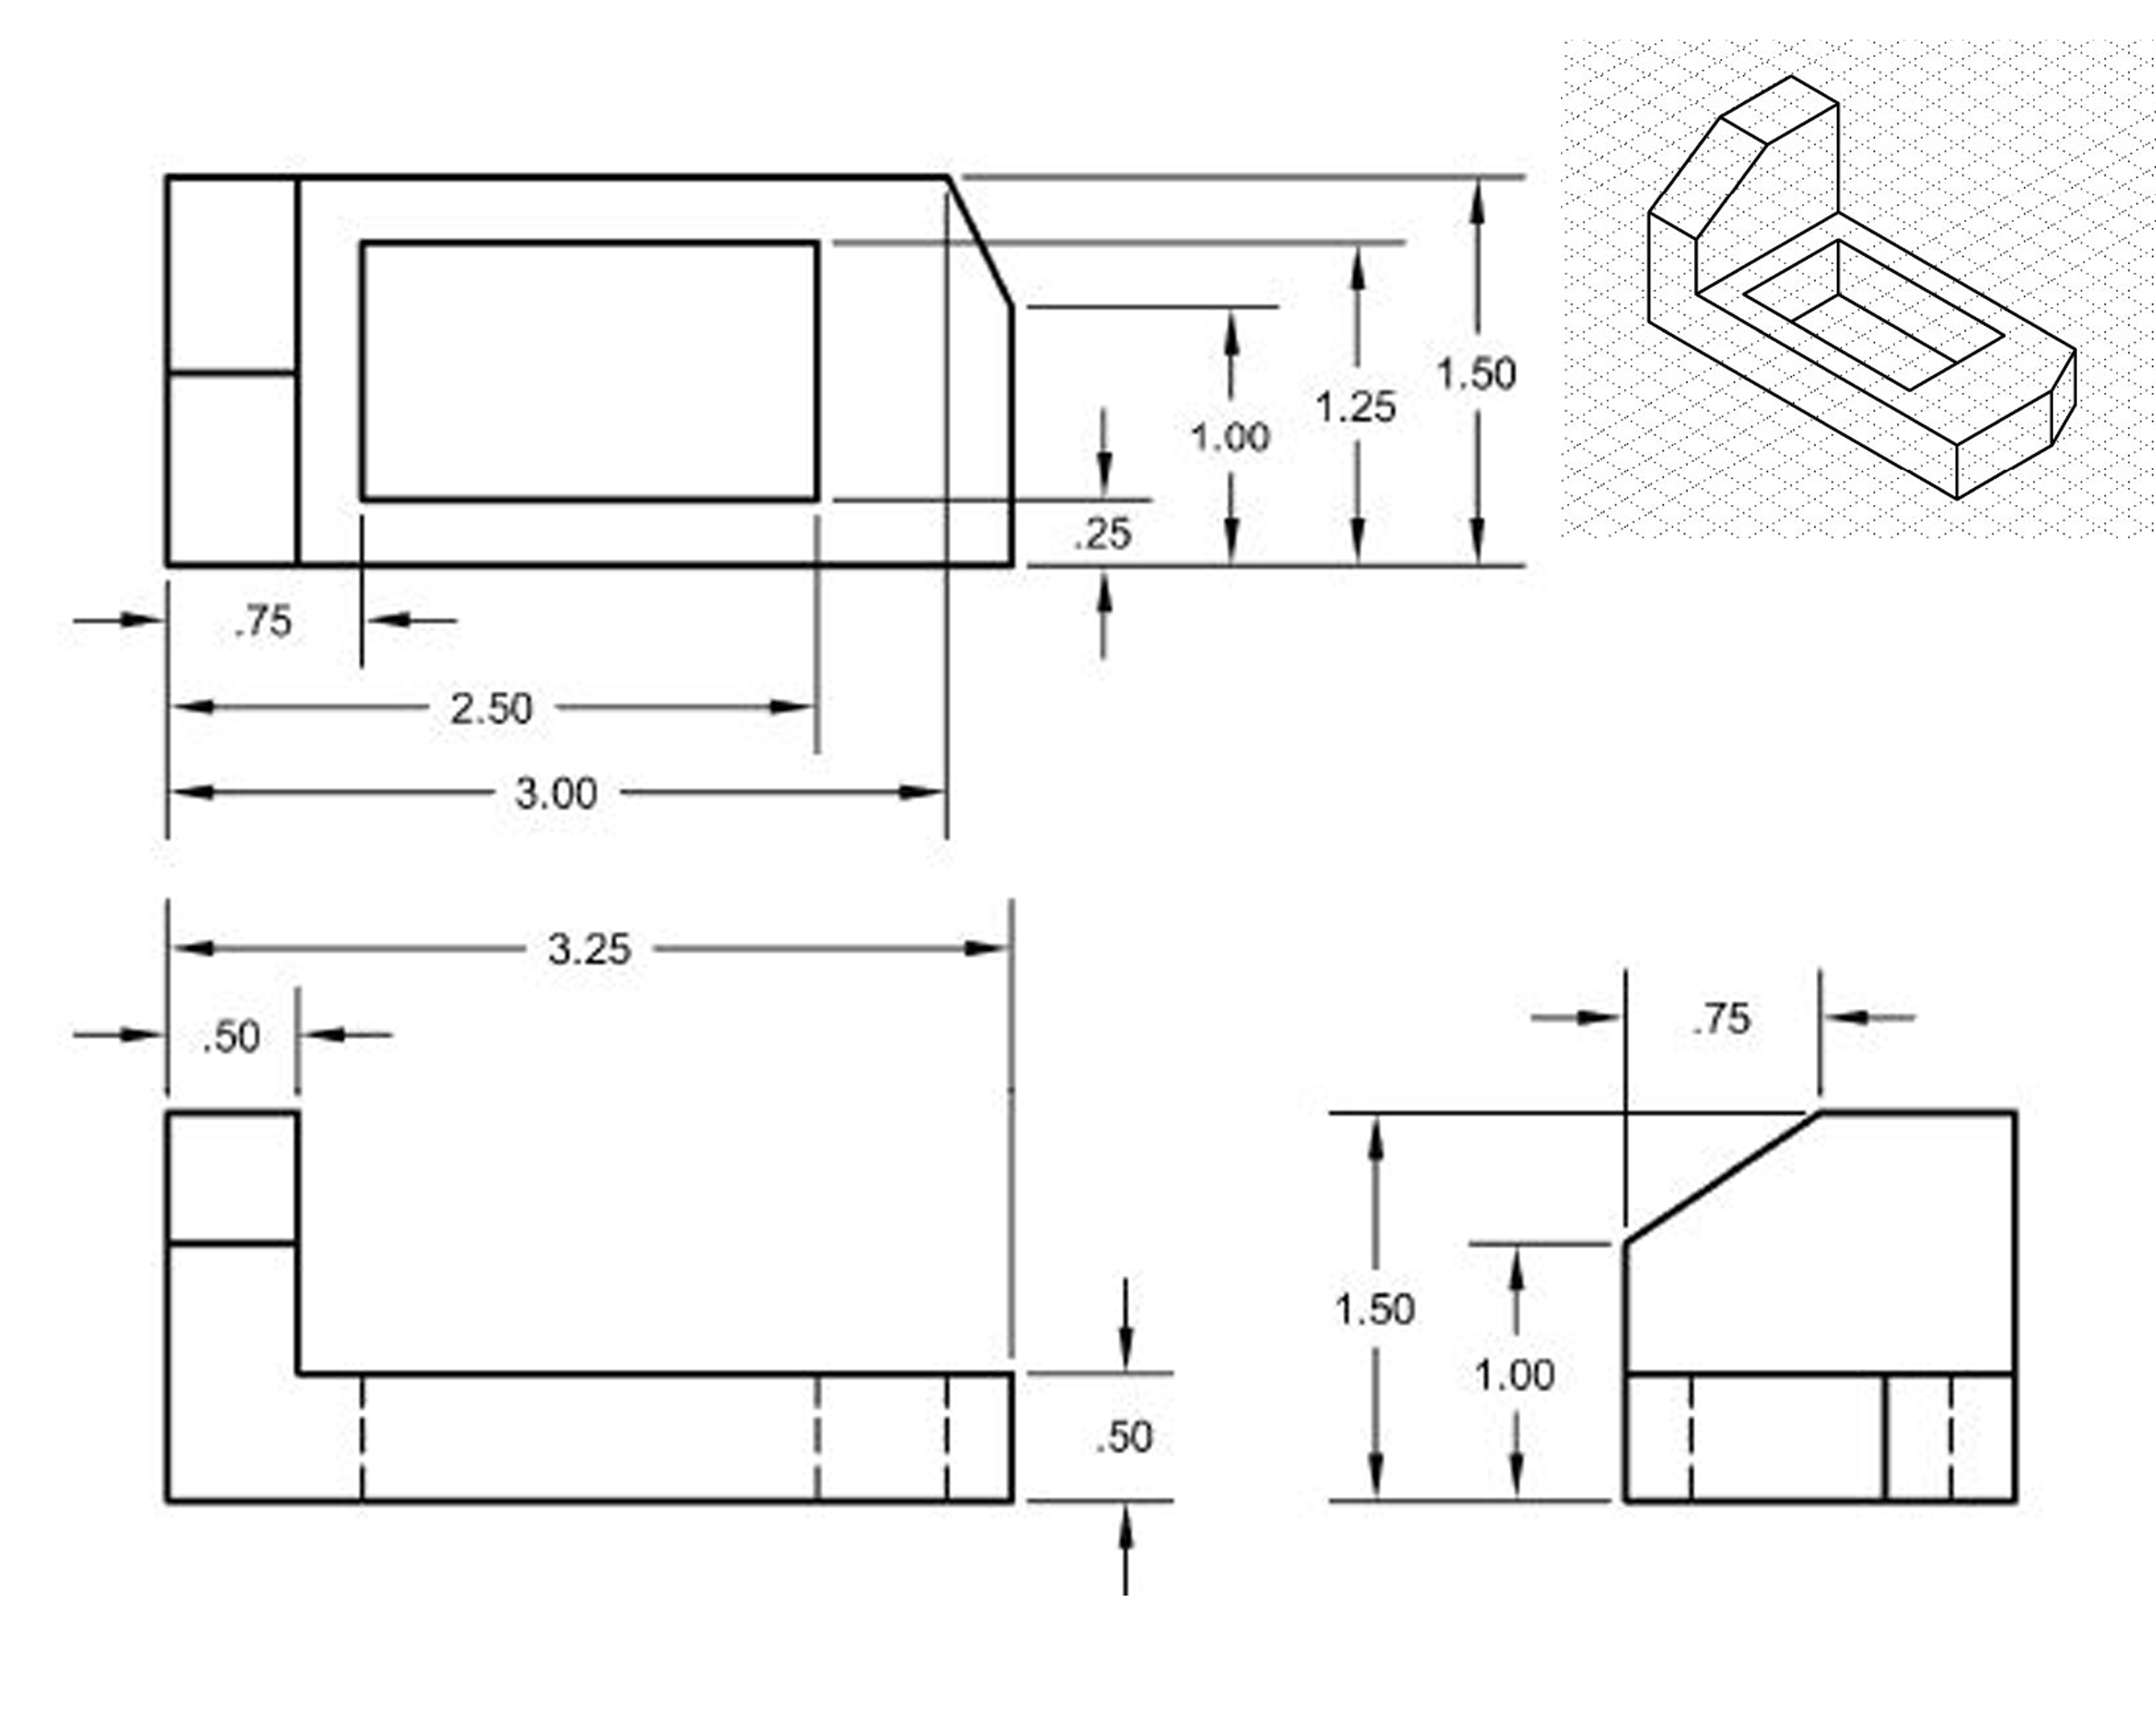
Assignment 12 Pictorials
- Drawing Linear Features
- Pictorials Introduction
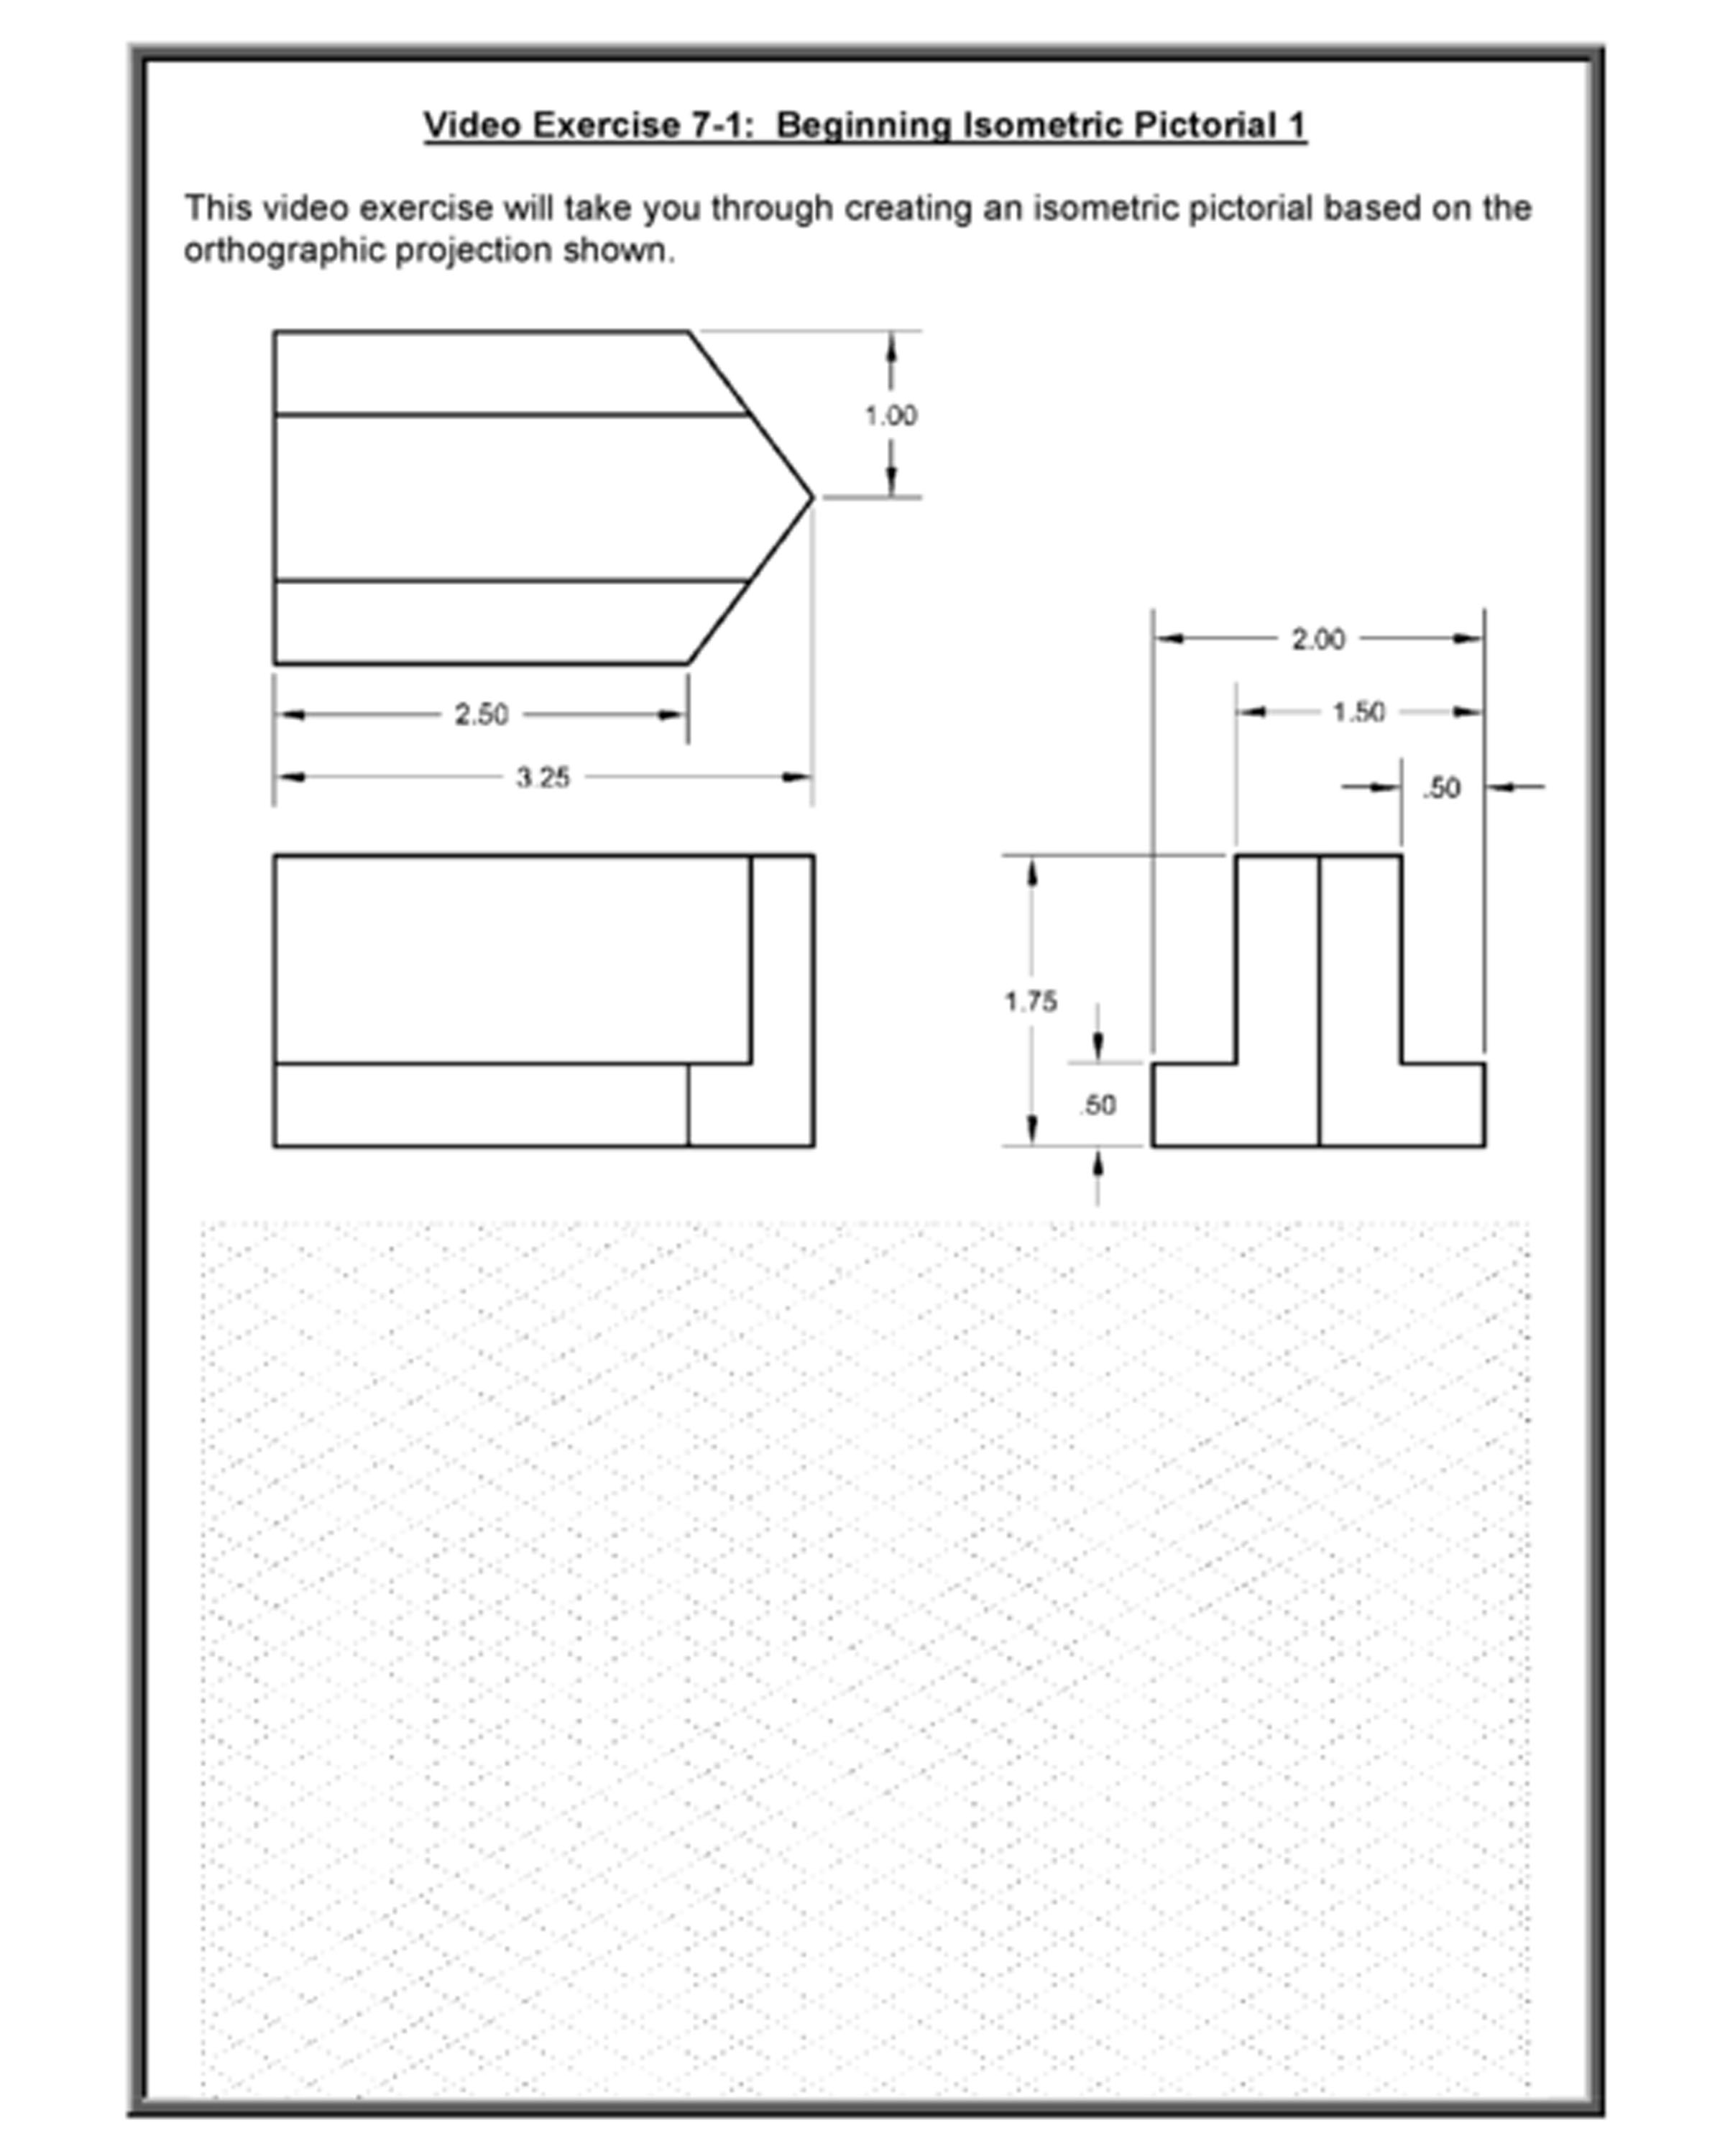
- Video Exercise 7-1: Beginning Isometric Pictorial 1 Video Exercise 7-1 Pictorials.jpg
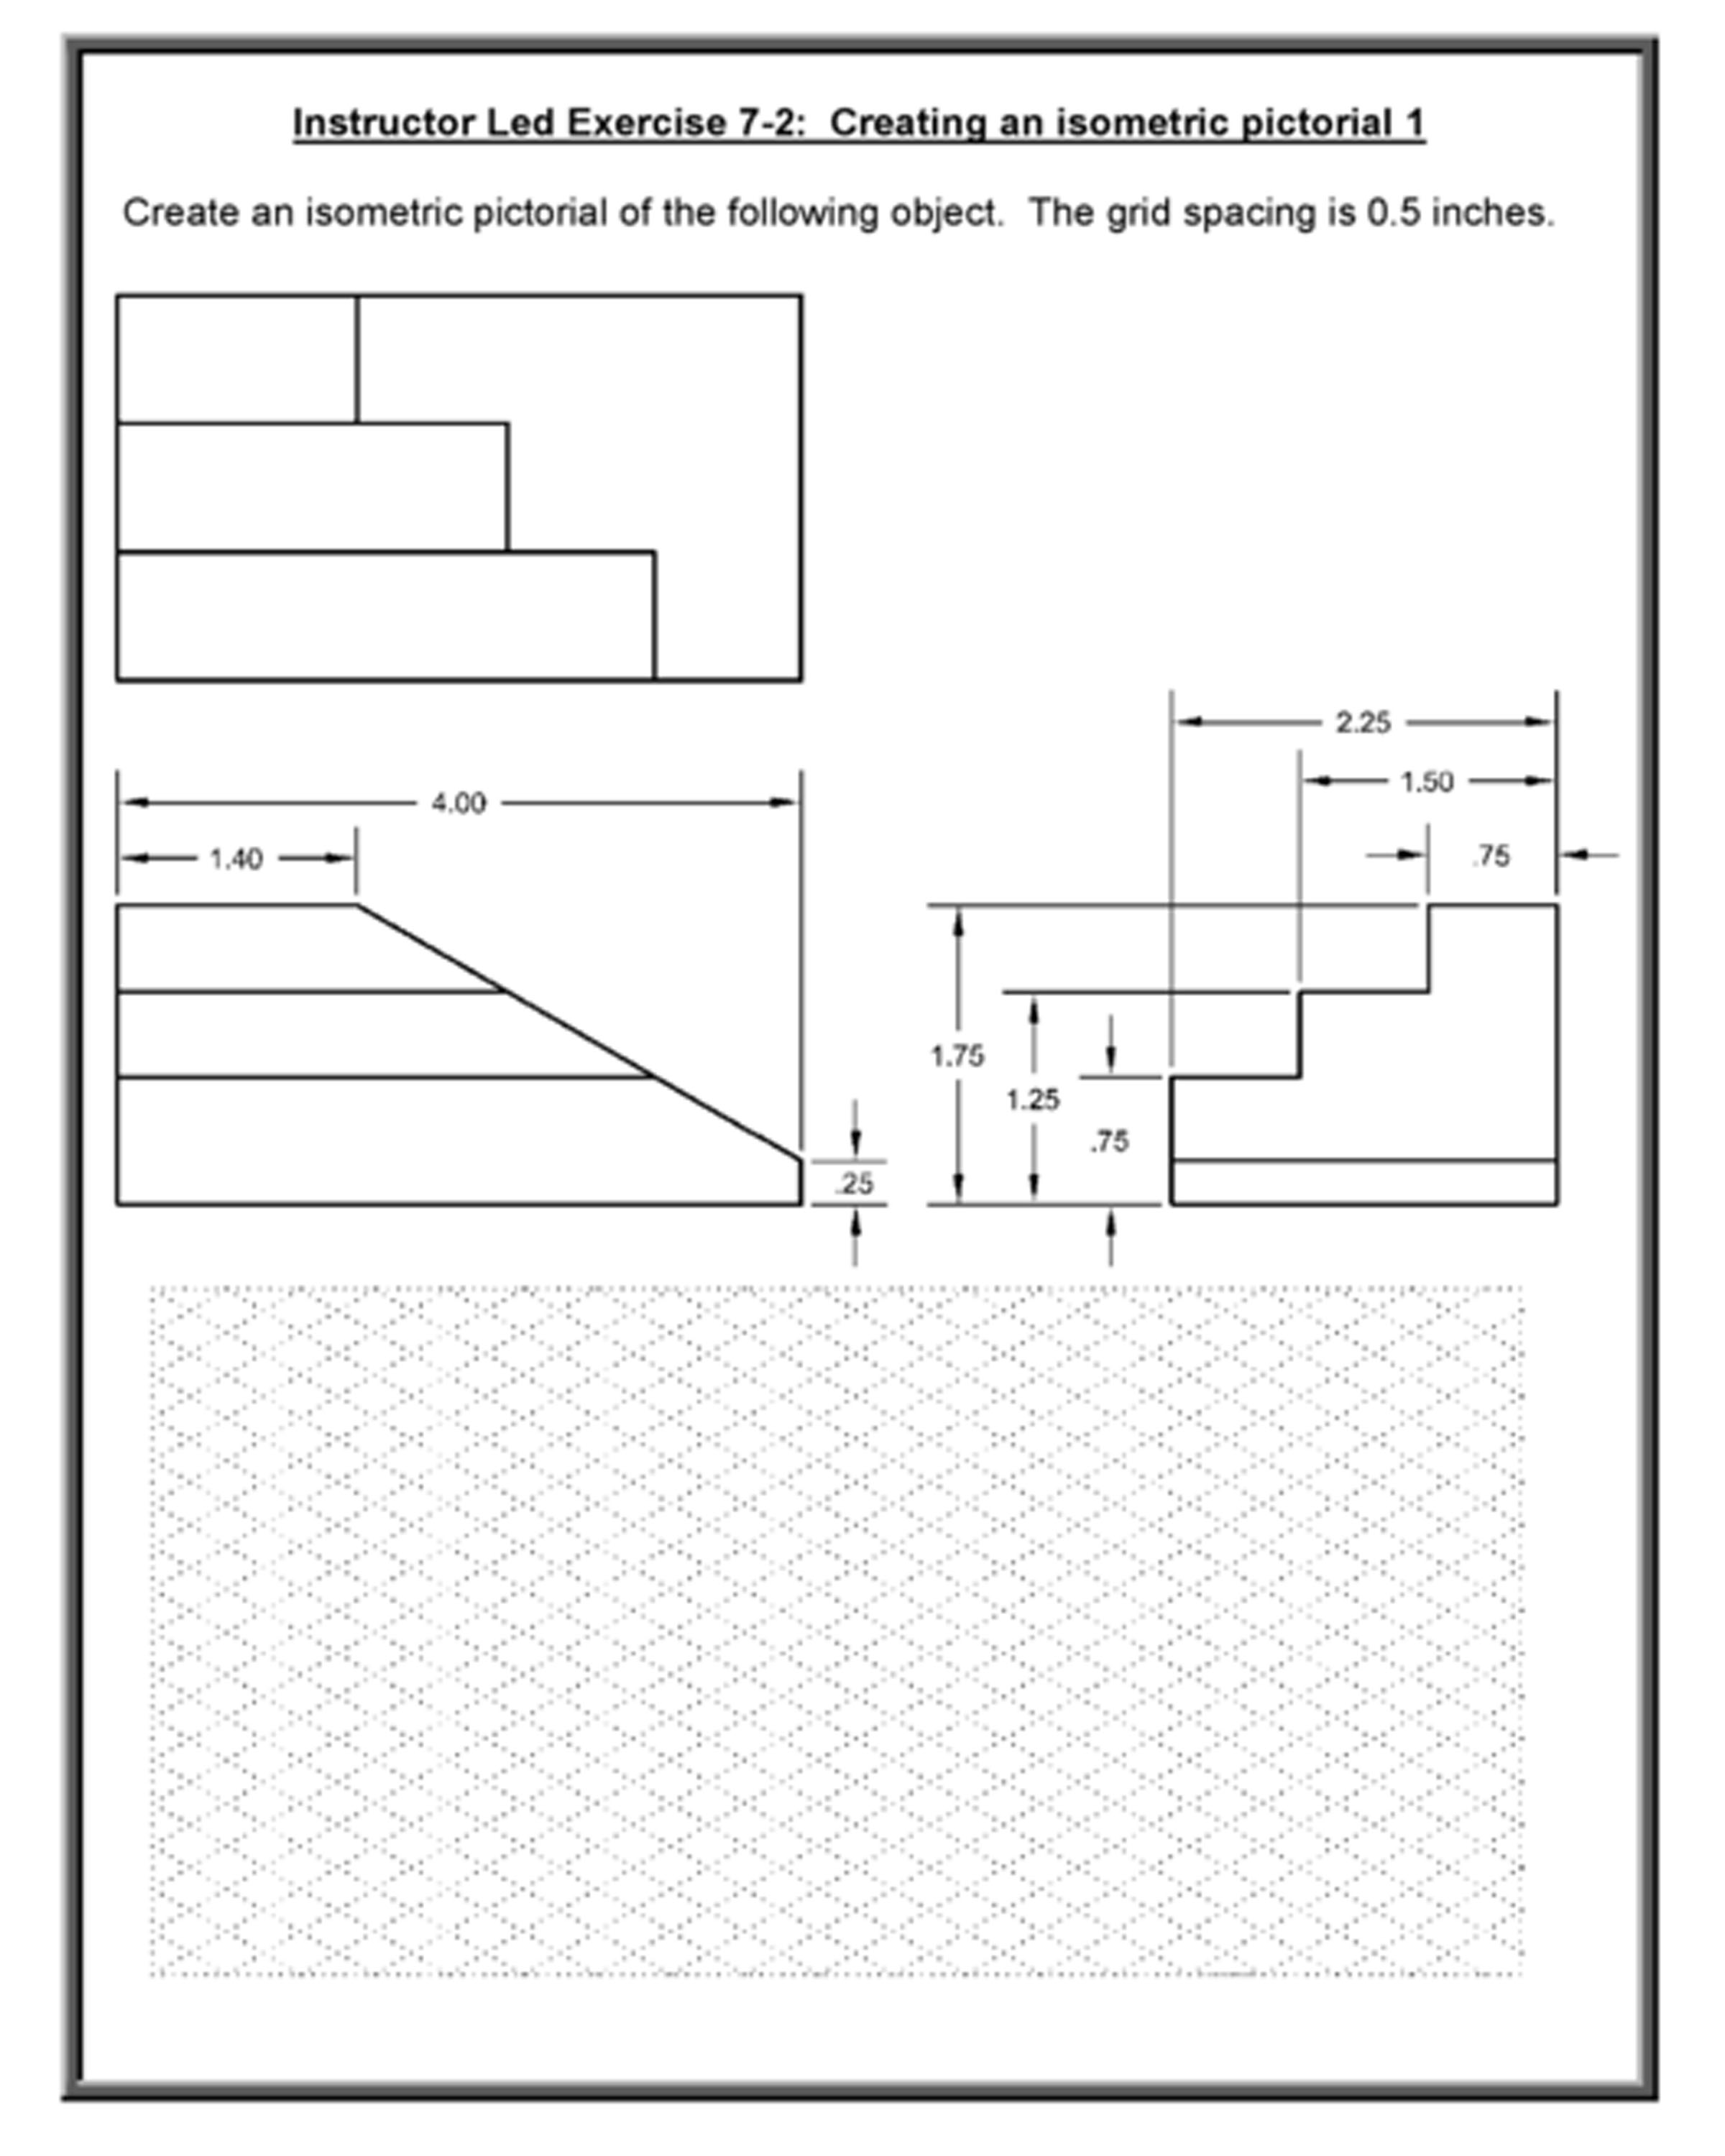
- Exercise 7-2: Isometric Pictorial 1 Video Exercise 7-2 Pictorials.jpg
- Video Exercise 7-3: Beginning 2 Video Exercise 7-3 Pictorials.jpg
- Exercise 7-4: Isometric Pictorial 2 Video Exercise 7-4 Pictorials.jpg
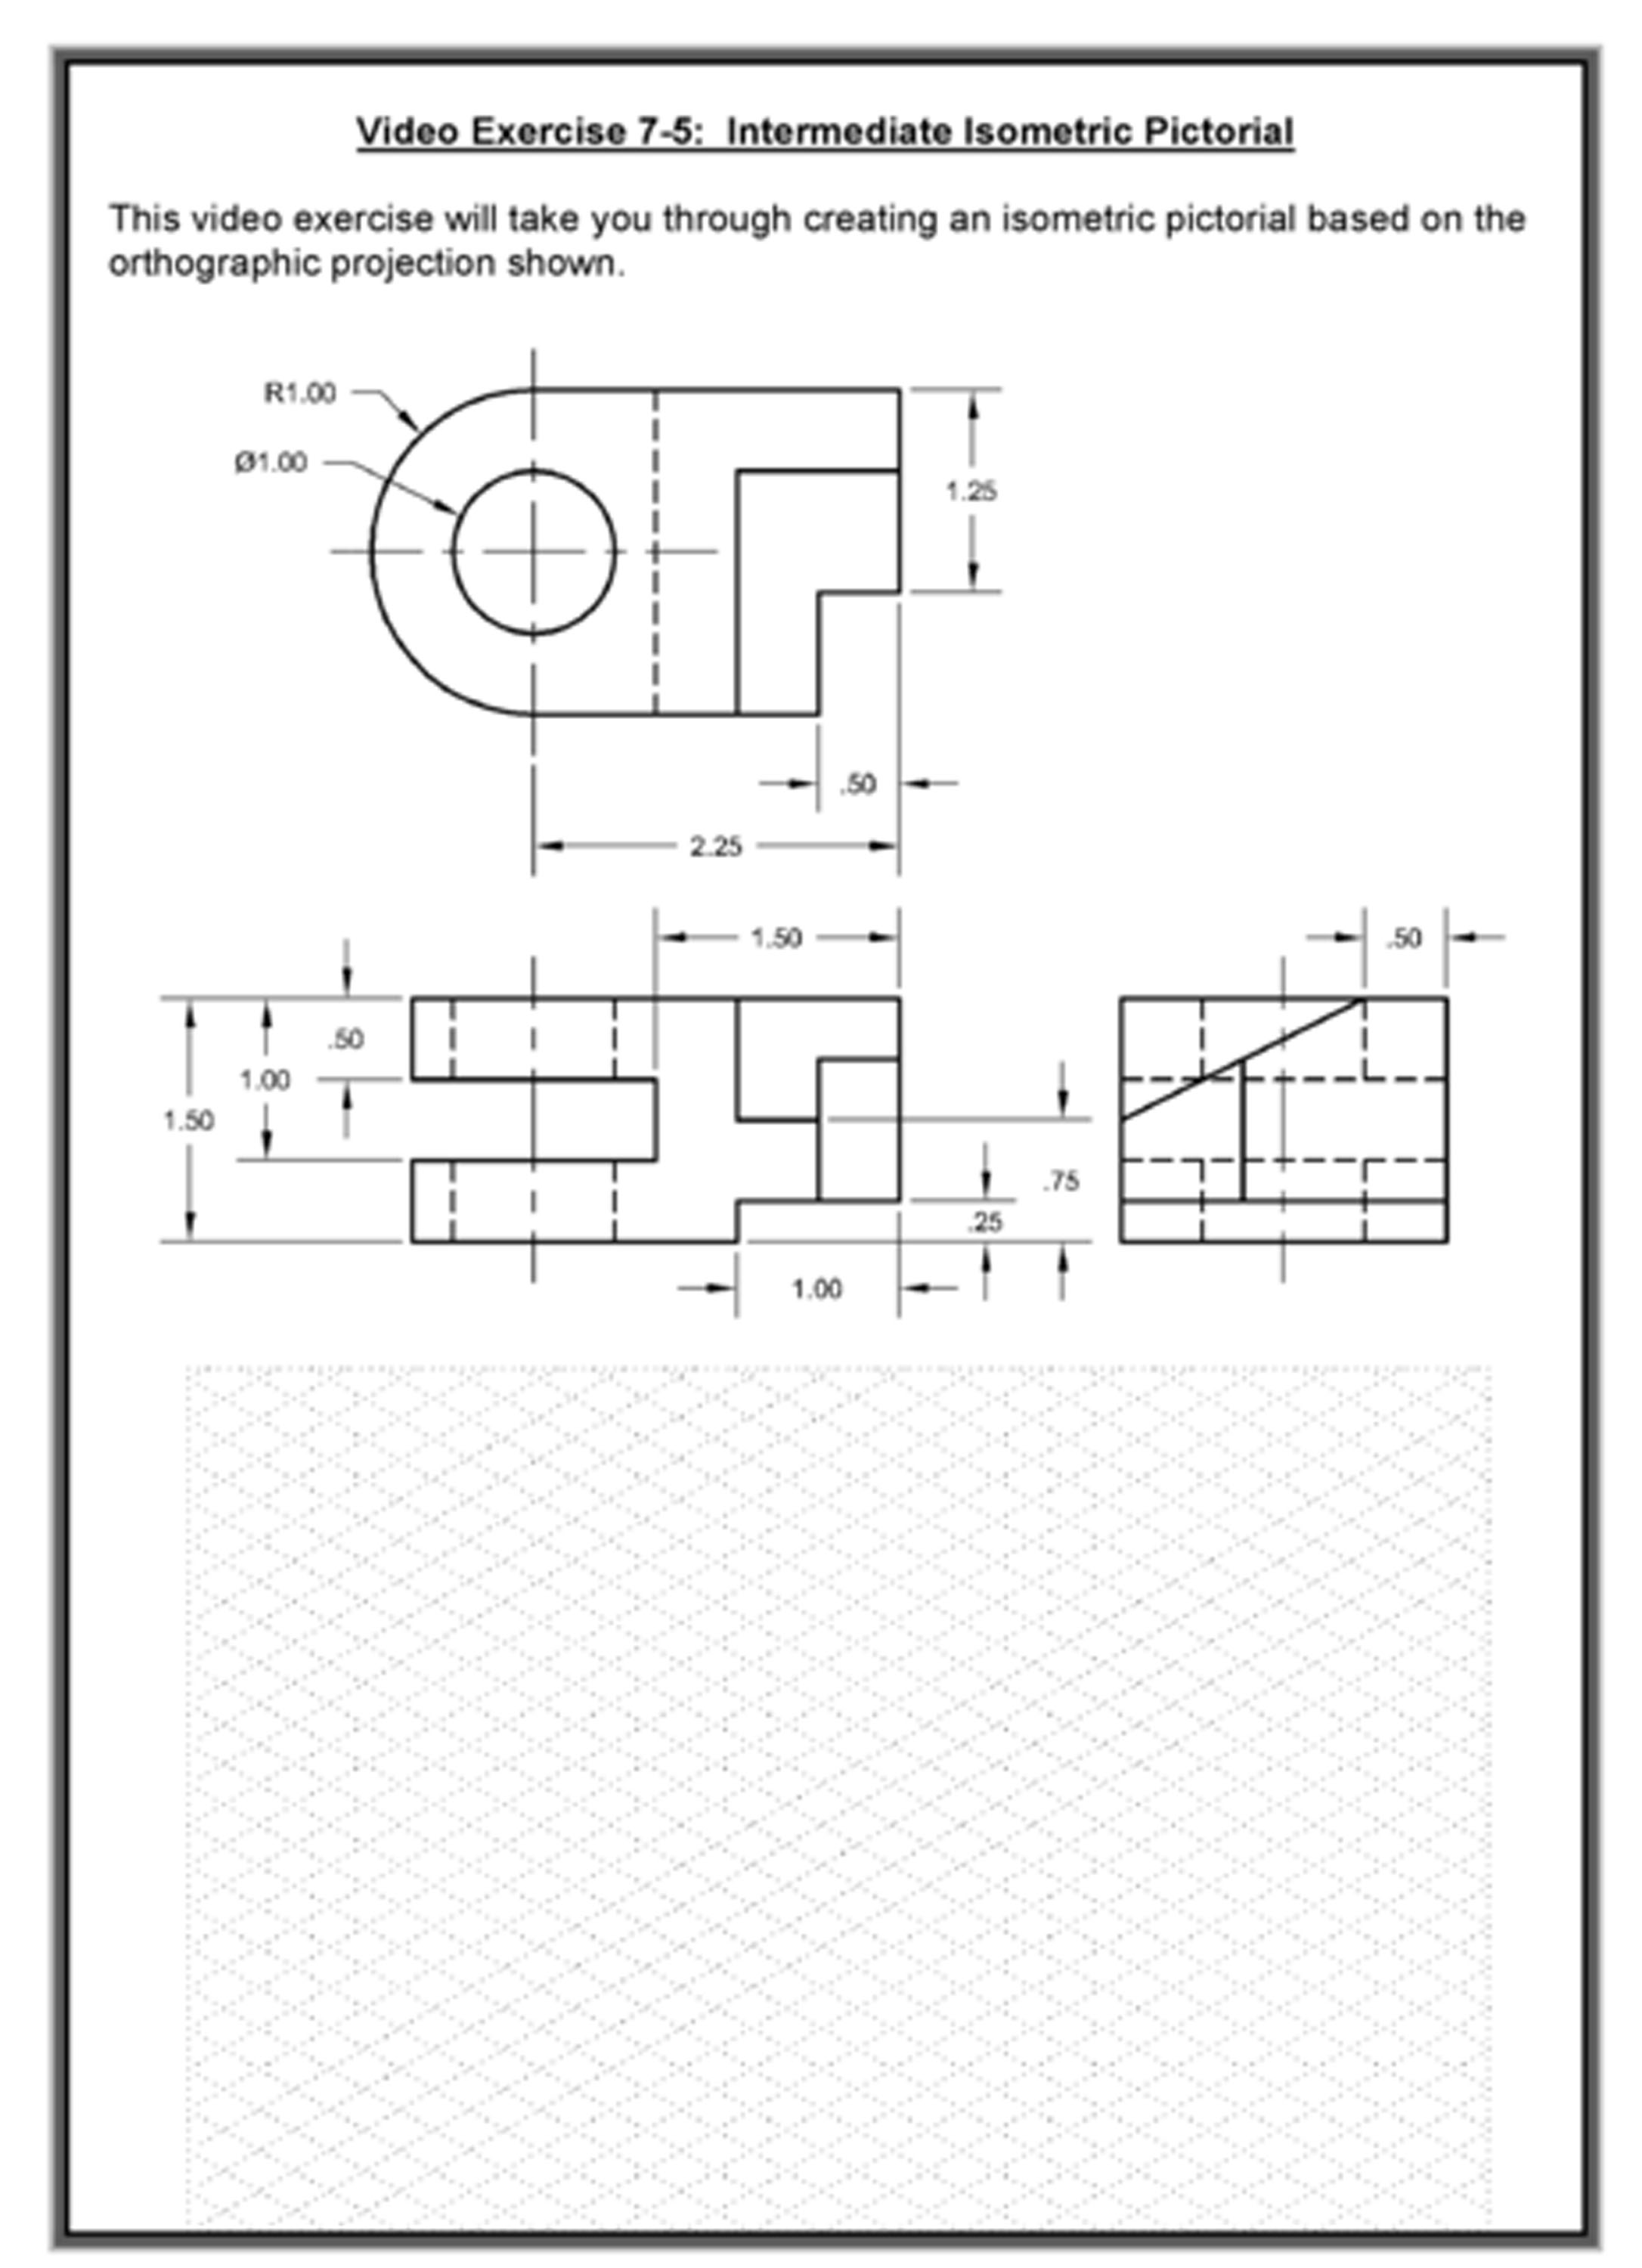
- Video Exercise 7-5: Intermediate Pictorial Video Exercise 7-5 Pictorials.jpg
- Oblique Pictorial Overview
- Draw Figure 7-16 in AutoCAD. Include the front, top, right side and an oblique. Use 45 degree angles to illustrate depth. P7-16 Oblique.jpg
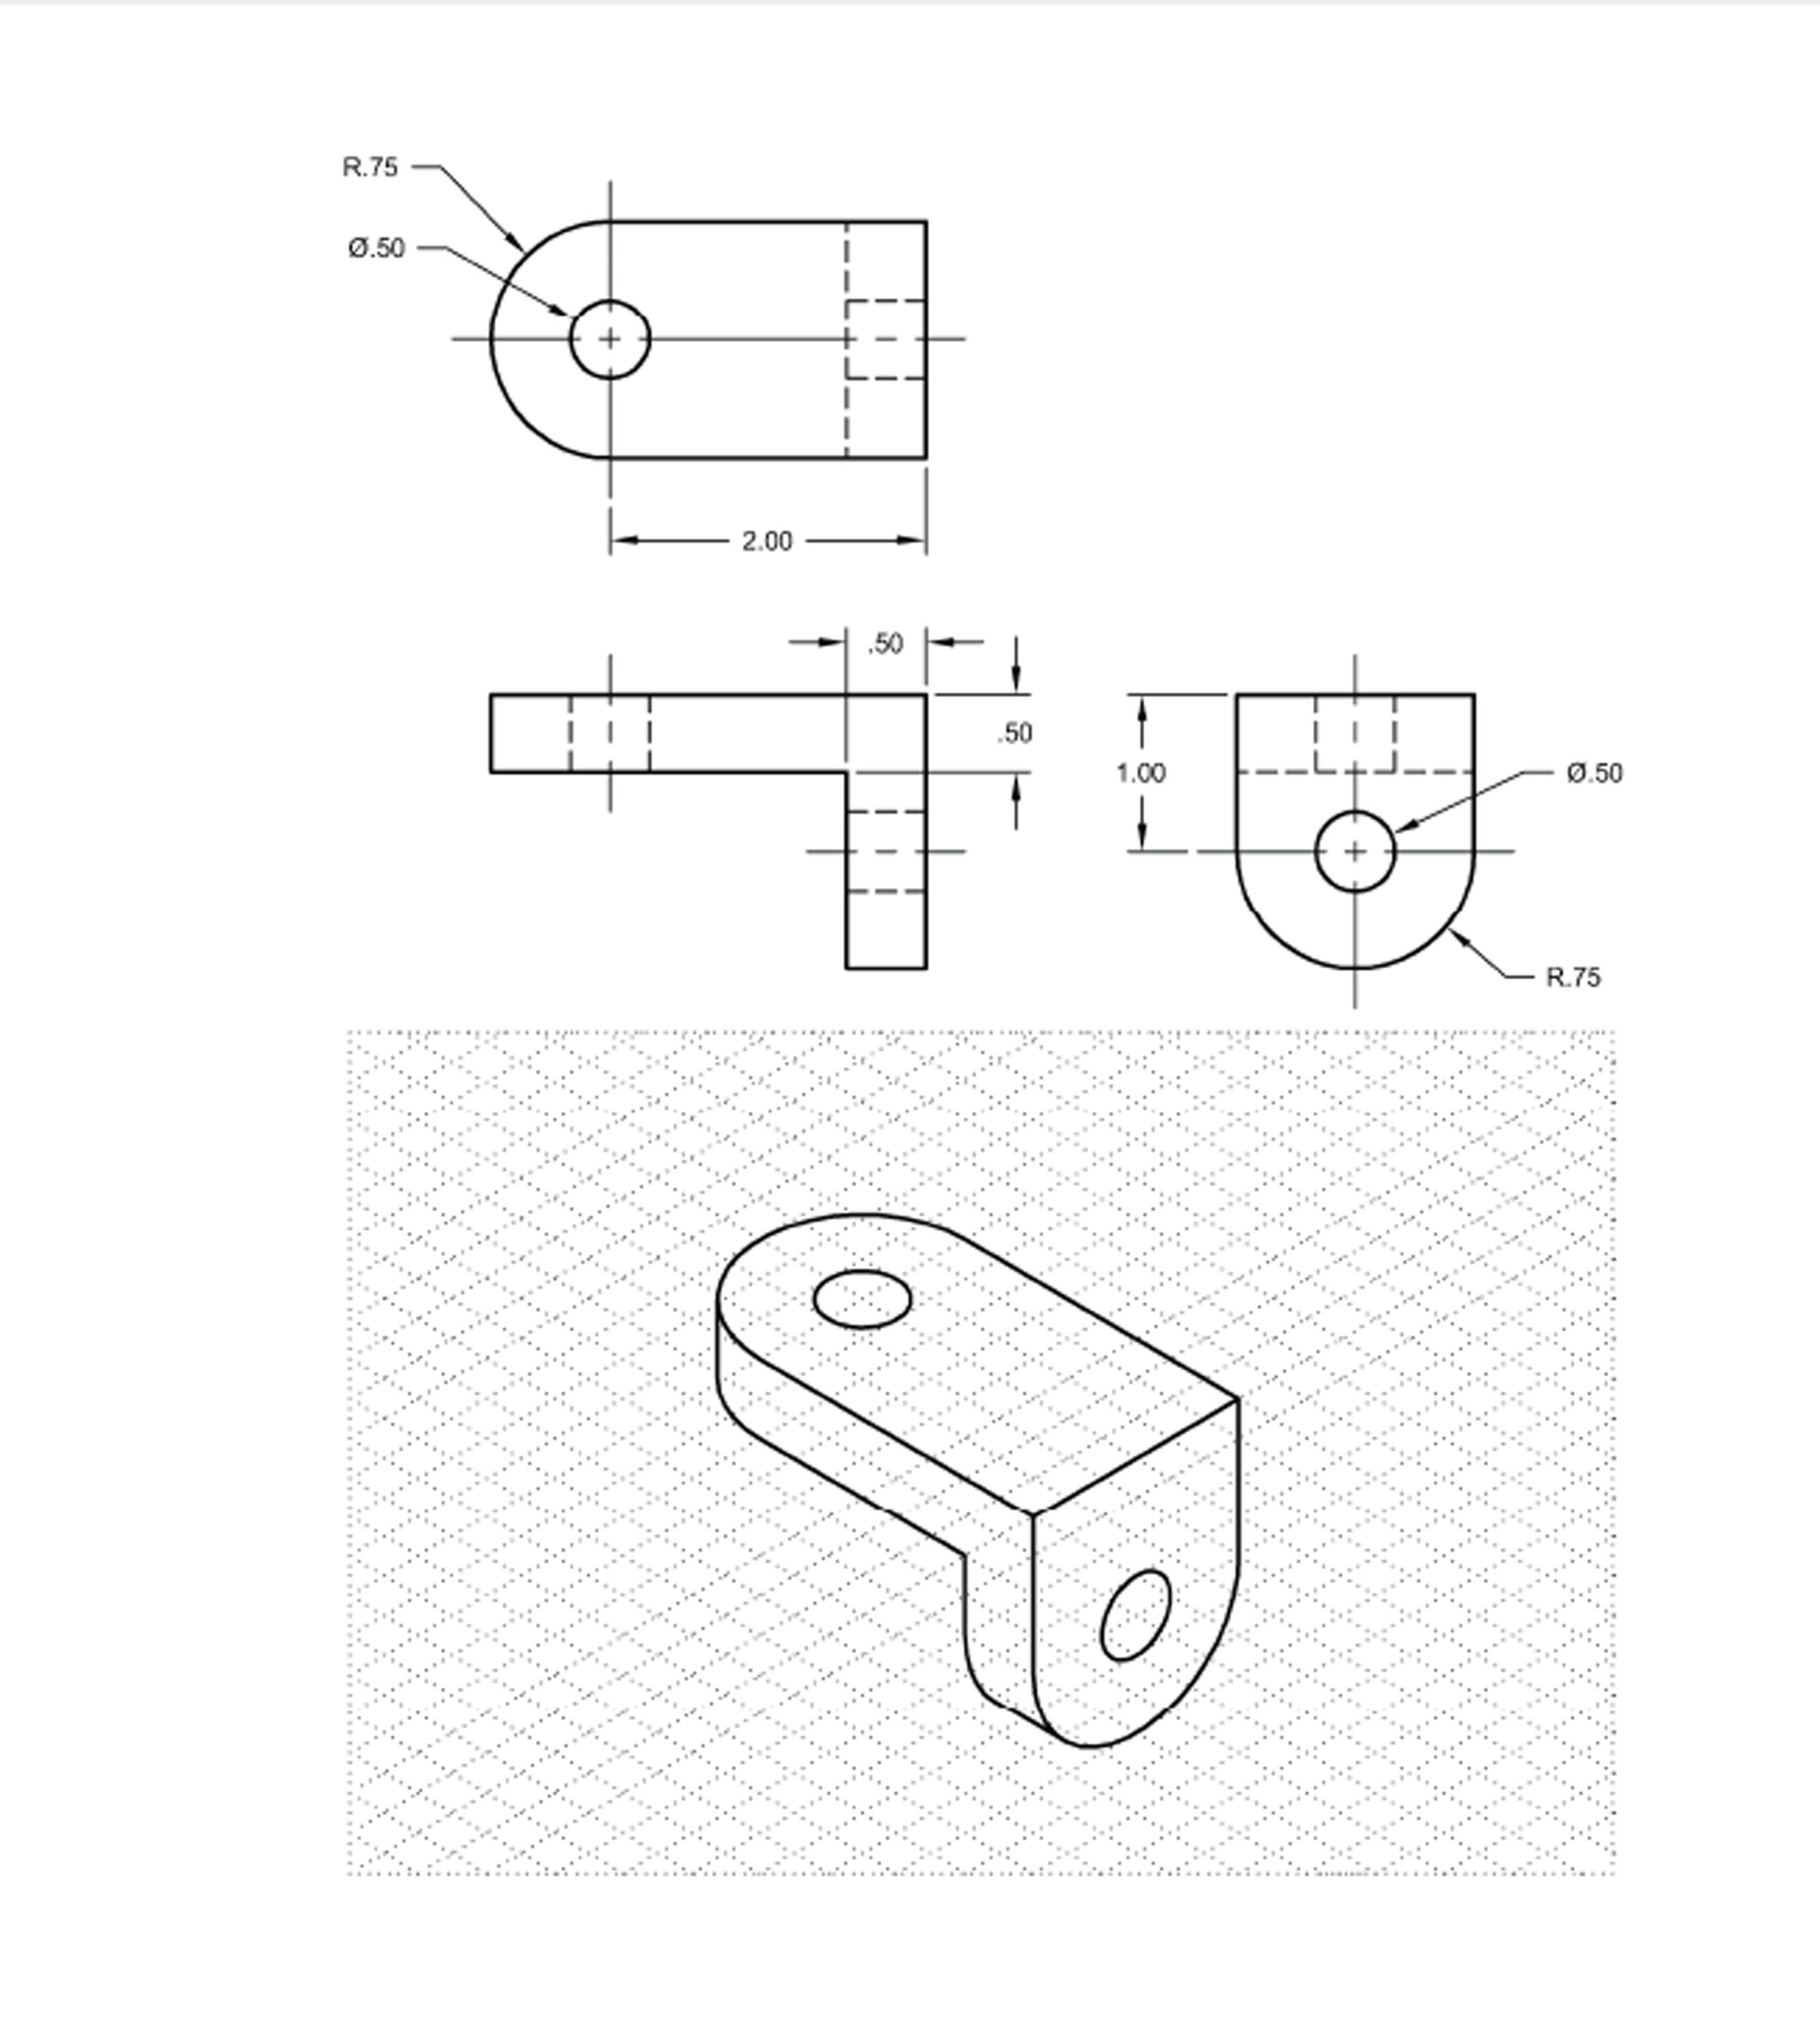
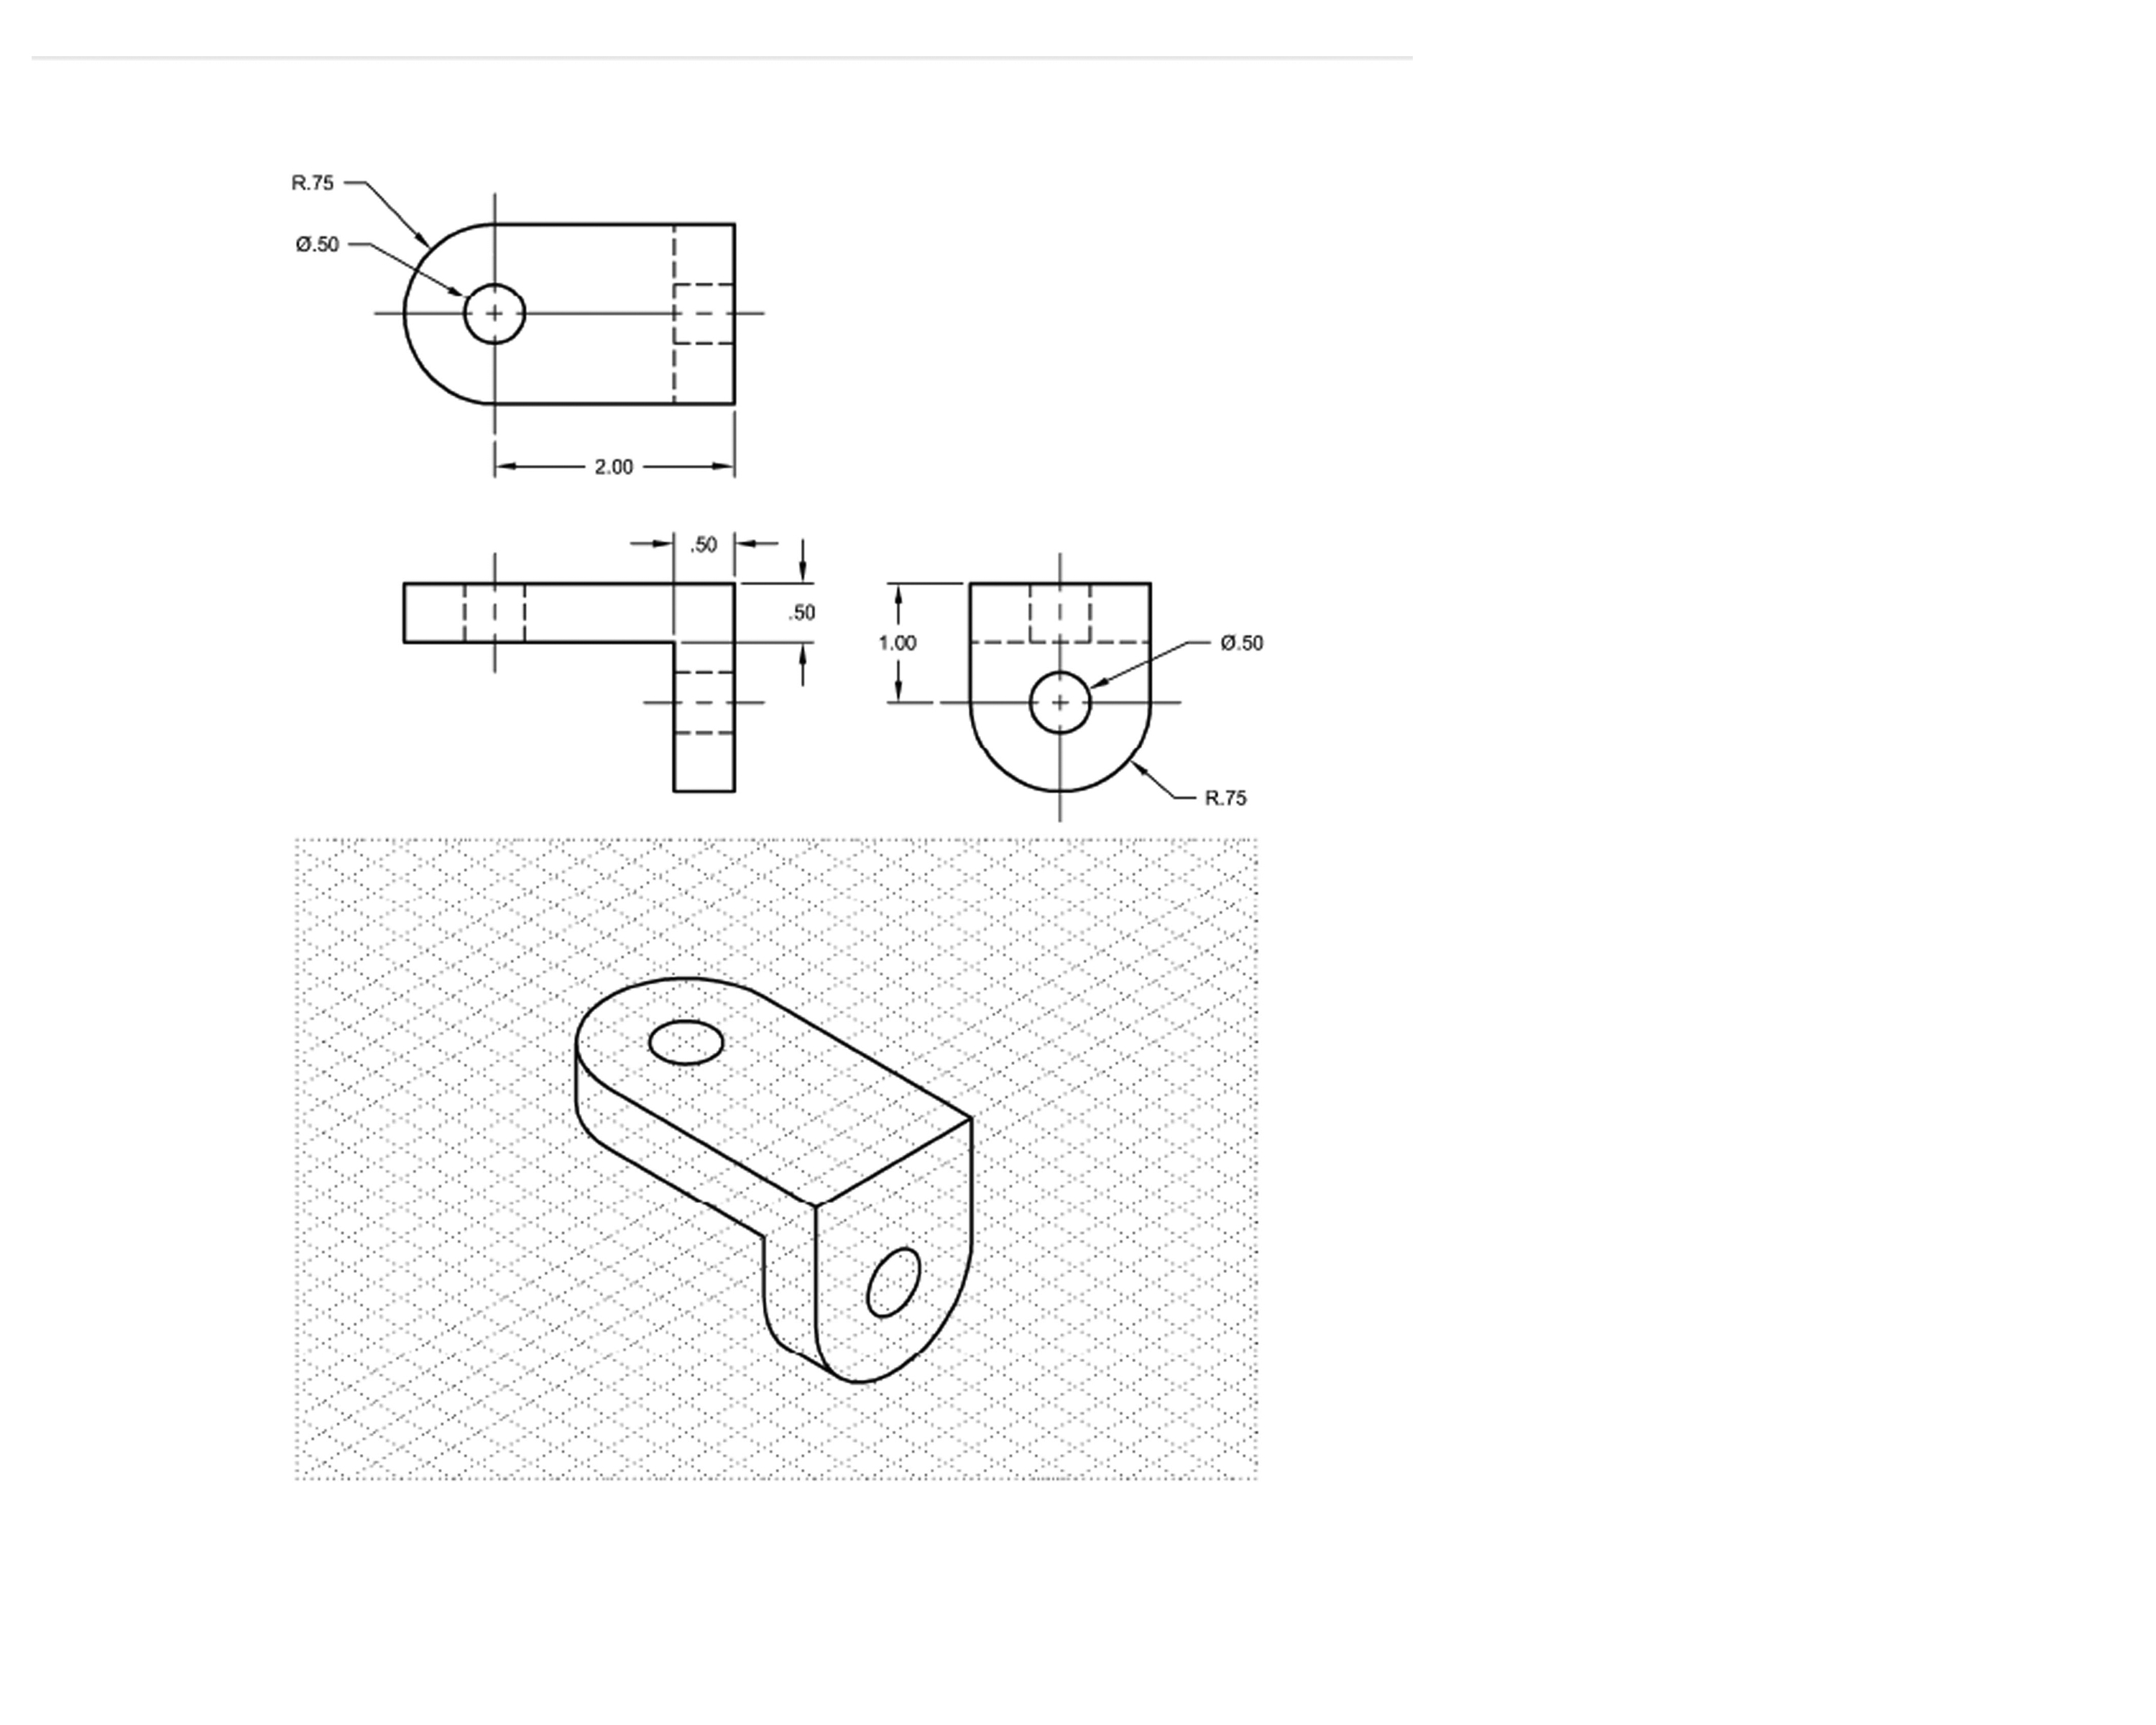
Drawing Circular Features
- Drawing Cylinders
- HOW TO DRAW AN ISOMETRIC.wmv
- Draw P7-1 as an Isometric P7-1 Part 1 Isometric.wmv P7-1 Part 2 P7-1.JPG P7-1 Answer Key.jpg
- Draw P7-8 as an Isometric P7-8 Part 1.wmv P7-8 Part 2.wmv P7-8.jpg
- Draw P7-7 as an Isometric P7-7 Part 1 Iso.wmv P7-7 Part 2 Iso.wmv P7-7.jpg
- Draw P7-5 as an Isometric on your own. P7-5 Final.jpg
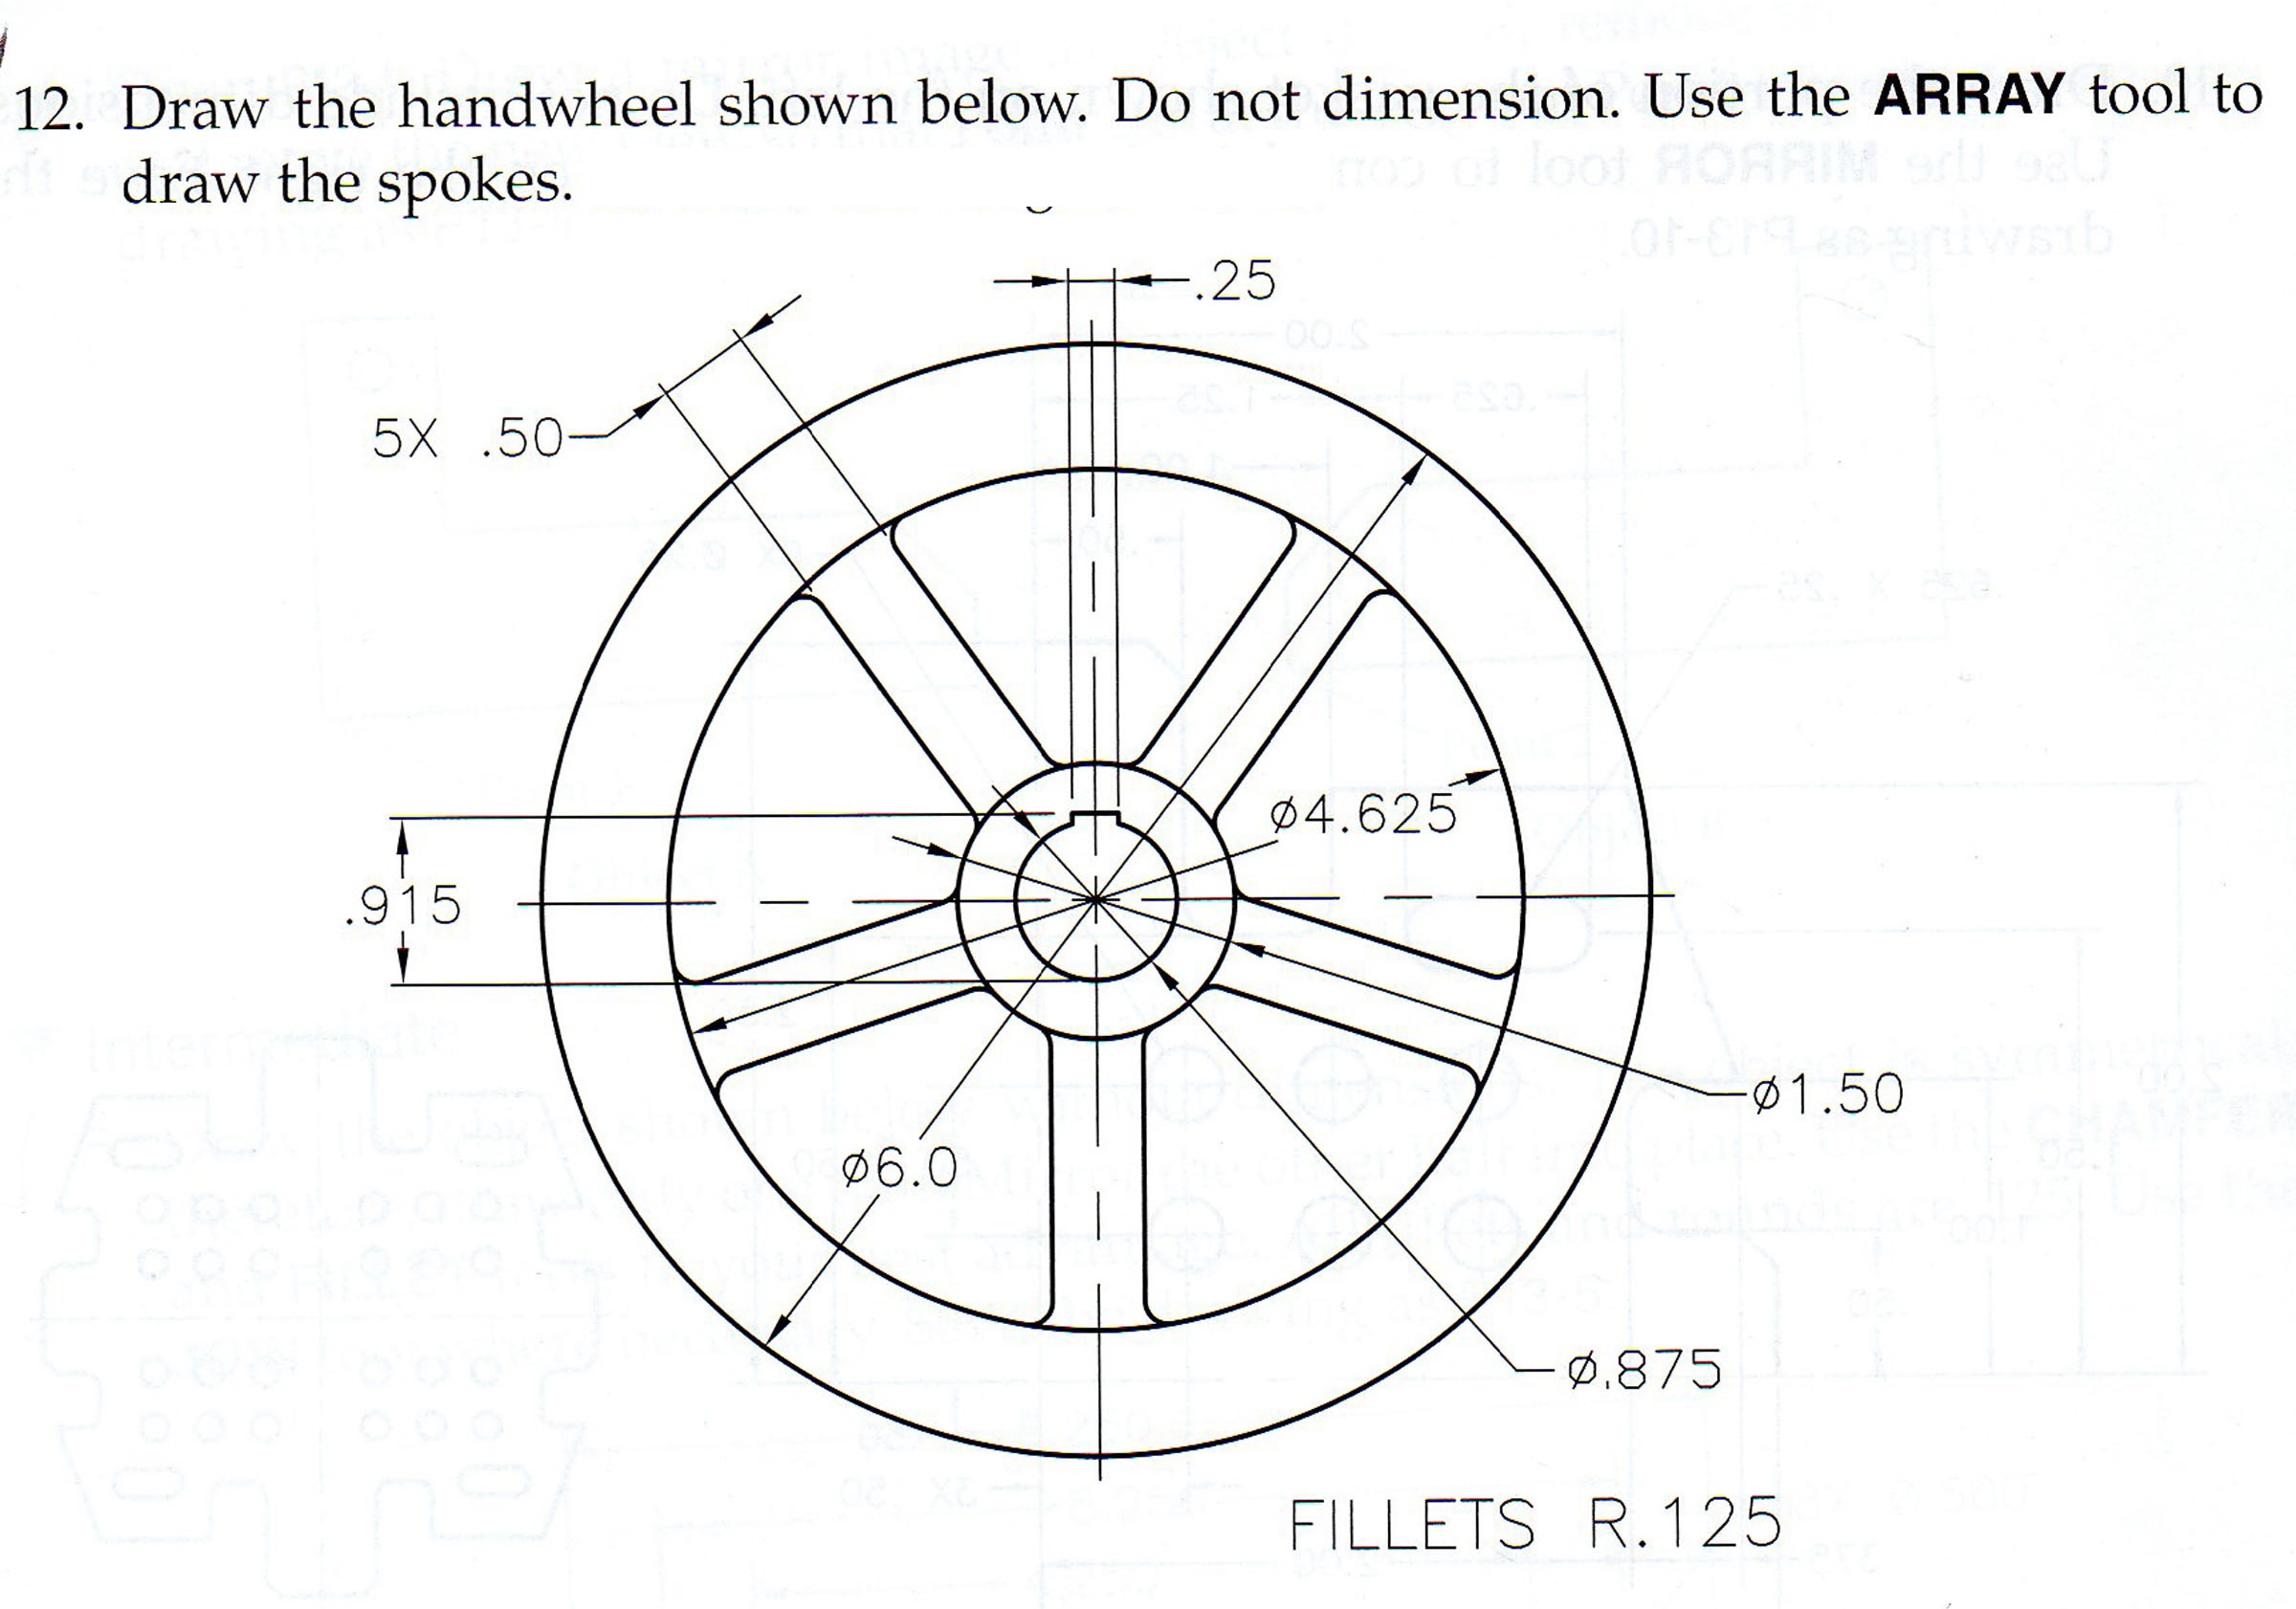
Assignment 15 Advanced AutoCAD Features
Wheel Video Wheel.jpeg
Inventor
How to Prepare to Print in Inventor Click for Video
